Diaper Caddy Setup: 10 Must-Haves for New Parents (and How to Refill)
Three in the morning. Baby is crying, your partner is already half-asleep, and you’re patting the changing table in the dark trying to find one single wipe. There is a better way to run this. Diaper caddy organization is the one nursery prep step most baby guides skim right past, and it is the thing you’ll thank yourself for at every middle-of-the-night change during those first four months.
This post walks you through exactly what to put in your diaper caddy, how to organize it with the 4-Slot Caddy Method I built after testing every possible setup with my sister through two babies. We’ll cover where to put caddies around your house so you’re never running to another room, how your supply list should shift as baby grows from newborn to 3 to 6 months, and how to build one as a gift that actually gets used. There’s a free printable checklist at the bottom. Let’s build your caddy before the next feeding.
Why a Diaper Caddy Beats Hunting Through Drawers at 3 A.M.
A changing table with ten beautiful drawers is useless at 3 a.m. if you cannot see into any of them. A diaper caddy is different. Everything lives at eye level, in one portable unit, accessible with one hand while the other holds a squirmy, very opinionated baby.
Most parents set up their nursery beautifully and then scatter supplies across three drawers, two baskets, and a shelf that sits at shoulder height. The caddy collapses all of that into one compact organizer you can carry from the nursery to the couch or into the back seat of your car without unpacking anything. That portability also matters for whoever else steps in to help, a partner, a grandparent, a postpartum doula. A well-organized nursery organization changing table setup means anyone can jump in without a walkthrough.
One more thing worth noting: caddies keep you honest about what’s actually in stock. Open a caddy and you see immediately that you’re down to four diapers. Open a drawer and you’ll convince yourself there are more in the back.

The 4-Slot Caddy Method: Your New Mental Model for Every Setup
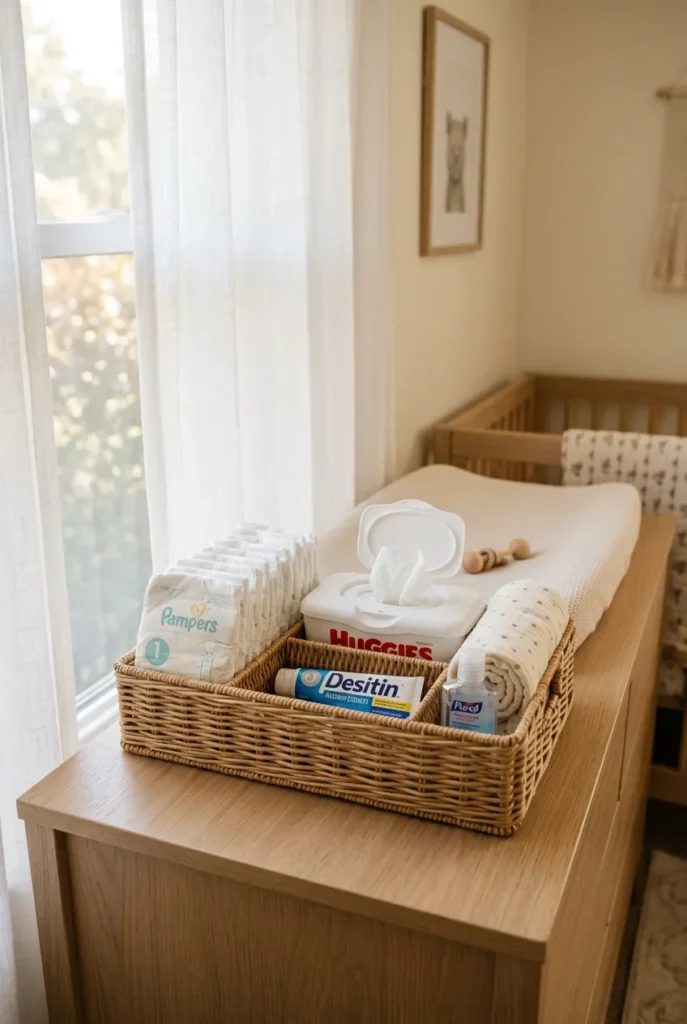
Here’s the framework I use every time, whether I’m loading a rolling cart, a wicker basket, or a compact canvas tote for the car. The 4-Slot Caddy Method divides your diaper caddy into four fixed categories: Change Essentials, Skin Care, Emergency Extras, and Cleanup. Every item you put in the caddy belongs to one of those four slots. If it does not fit a slot, it probably does not belong in the caddy at all.
That single rule is what keeps a caddy from becoming a general-purpose junk bin by week three. New parents are exhausted and they grab things. Without a system, random items accumulate until you cannot find anything quickly.
The 4-Slot framework also scales cleanly in either direction. A minimalist diaper caddy organization setup runs 2 items per slot, 8 items total. A fully loaded newborn caddy carries 3 per slot. The slots are the structure. You control the volume. Use this framework as your mental checklist every time you restock and you will spend under 90 seconds on each refill rather than standing there trying to remember what you’re out of.

10 Must-Have Items for Your Diaper Caddy Organization
These are the 10 items that go in every caddy, organized by slot so restocking takes two minutes, not ten.
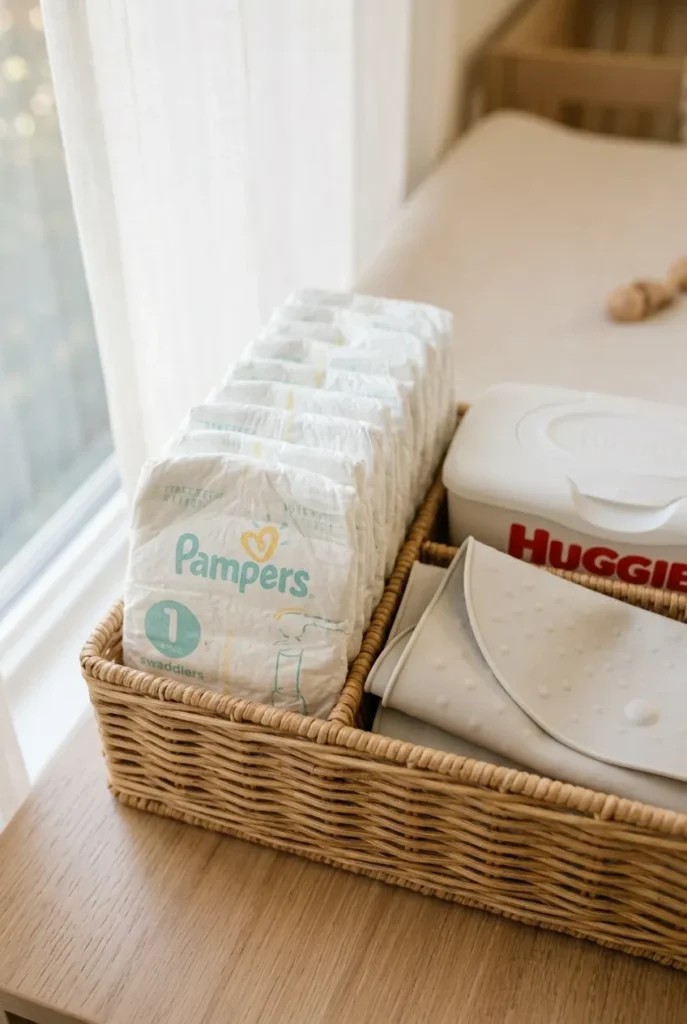
Slot 1: Change Essentials
1. Diapers. A newborn caddy should hold at least 10 diapers, since newborns average 8 to 12 changes every day during the first 8 weeks. Start with size 1 and move to size 2 once baby hits about 12 pounds, usually around weeks 5 to 8. Pampers Swaddlers and Huggies Little Snugglers are both worth trying first. Each has a yellow-to-blue wetness indicator stripe, which sounds like a gimmick until you’re trying to tell at 2 a.m. whether a change is actually needed without fully waking baby up.
2. Wipes. Keep one refillable pop-up wipes dispenser in the caddy rather than stacking multiple flat packs. Water Wipes (99.9% water) are the gentlest option for the first 4 to 6 weeks when newborn skin is most reactive. Pampers Sensitive are a reliable step up after that.
3. Portable changing mat liner. A waterproof fold-flat silicone mat or a pack of disposable Munchkin Waterproof Changing Pad Liners, something around 13 by 17 inches, turns any surface into a clean change station. Summer Infant makes a fold-flat pad that fits inside most standard wicker caddies without taking up too much room.
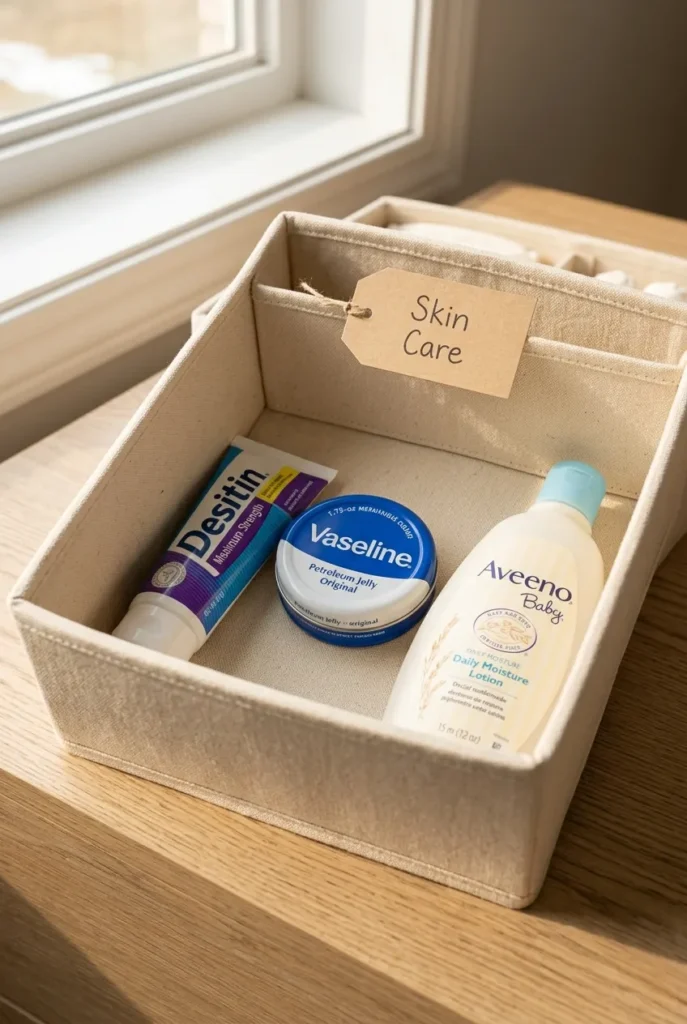
Slot 2: Skin Care Basics
4. Diaper cream. Keep one dedicated tube in the caddy, full stop. Don’t let this item live in a general medicine cabinet. Desitin Maximum Strength (40% zinc oxide) is the most-cited first-line recommendation for both preventing and treating diaper rash. Boudreaux’s Butt Paste is a gentler option if baby’s skin runs particularly sensitive in the early weeks. The American Academy of Pediatrics guidance on diaper rash prevention is a quick read and gives a clear guide on when a barrier cream is enough versus when a rash needs a doctor’s attention.
5. Vaseline. A 1.75-ounce Vaseline tin takes up almost no space and serves as an effective barrier layer between cream applications. It’s especially useful during the newborn stage when the umbilical cord stump is still healing and you want a gentle, fragrance-free option at every change.
6. Baby lotion. Aveeno Baby Daily Moisture Lotion or CeraVe Baby Moisturizing Lotion, either works well. One 8-ounce bottle handles roughly 60 to 80 changes if applied lightly after each wipe-down, which means you’ll go through about one bottle per month during the newborn stage.
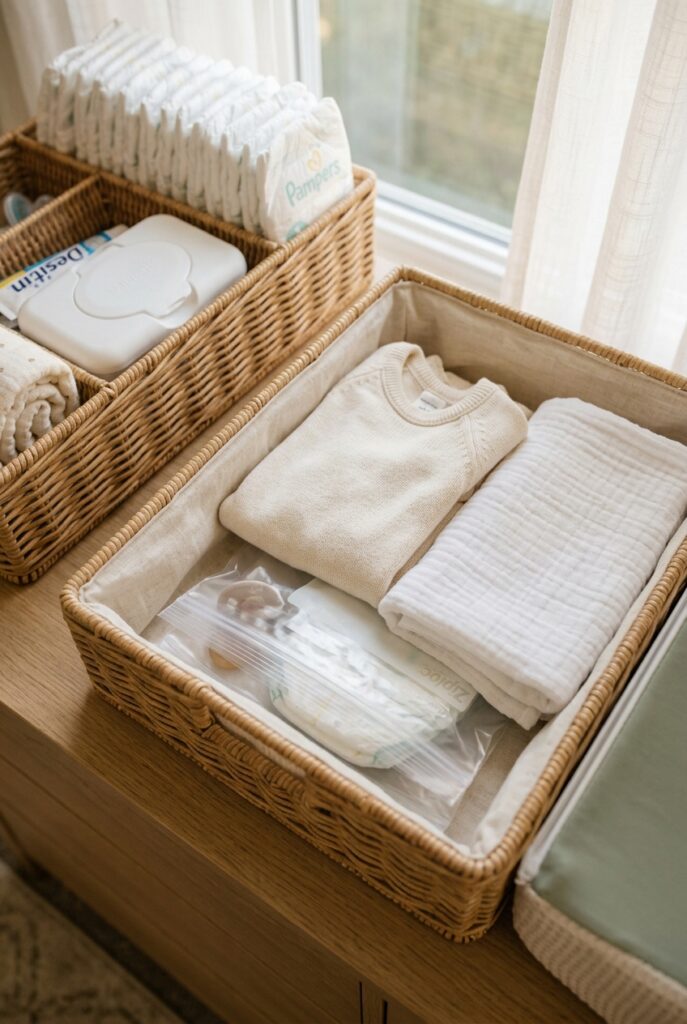
Slot 3: Emergency Extras
7. Extra outfit. One full outfit, a onesie plus footie pants or a sleeper, always packed one size up from what baby is currently wearing. Blowouts choose their moments carefully and they never pick convenient ones. I started keeping a size-up outfit in every caddy after a genuinely terrible drive home from a 6-week pediatrician visit with my niece. Lesson learned very fast.
8. Burp cloth. A burp cloth doubles as a modesty cover during changes if you’re in a shared space, and it handles the surprise situations every new parent quickly learns to anticipate.
9. Resealable bags. Two or three gallon-size Ziploc bags folded flat at the bottom of the extras slot. A soiled outfit goes straight into a bag until you reach a laundry sink. Small, takes up no real space, saves you every time.
Slot 4: Cleanup and Safety
10. Hand sanitizer. Purell Original 2-ounce travel size sits in the caddy’s smallest pocket and gets used every single change. CDC hand hygiene guidelines are clear that hands should be cleaned before and after every diaper change. A caddy-side sanitizer makes that a two-second habit instead of a trip to the sink, which matters most when you have one hand holding a wriggly baby and the other doing everything else.
A quick note on the minimalist version: if you prefer a stripped-down portable diaper caddy organization setup, run 2 items per slot. Diapers and wipes for Slot 1. Cream and Vaseline for Slot 2. One onesie and one Ziploc for Slot 3. Hand sanitizer for Slot 4. Nine items total, fits in the smallest rope caddy, covers every scenario.
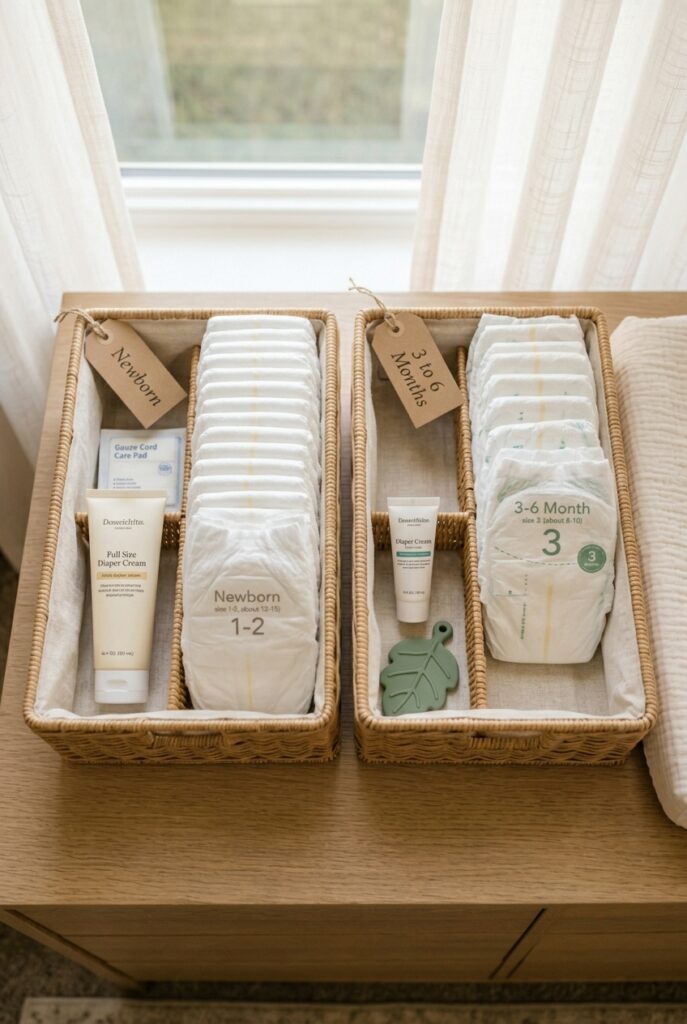
Newborn vs. 3-to-6-Month Baby: How to Restock Your Diaper Caddy as Baby Grows
This is the part nobody talks about. Your diaper caddy organization setup at 2 weeks looks meaningfully different from your caddy at 4 months, and failing to adjust means you’re hauling supplies your baby has outgrown while running short on things they actually need now.
Here’s the restocking evolution by stage:
| Stage | Diapers in caddy | Wipes per change | Cream frequency | Add to caddy |
|---|---|---|---|---|
| Newborn (0 to 3 months) | 10 to 12 | 4 to 6 | Daily barrier application | Cord care pads (remove at week 3 to 4) |
| 3 to 6 months | 6 to 8 | 2 to 4 | As needed only | Small teether or pacifier clip |
Two things to act on right away when baby hits the 3-month mark. First, check the diaper size in your caddy. A size 1 diaper on a 14-pound baby is a blowout waiting to happen. Second, swap the full 4-ounce diaper cream tube for a travel-size in the caddy and move the backup tube to the closet shelf, since you’ll apply it far less often by this stage.
Also check out the toy rotation system post here on the site if you’re thinking through what else to cycle in and out of baby’s space as they grow and what a sustainable rotation schedule actually looks like.
The 3-Station Caddy Setup: Nursery, Living Room, and Car
One caddy is not enough. That sounds like a product pitch but it is genuinely practical. During the first 8 weeks, you will spend the majority of your day outside the nursery. Running there for every change costs 2 to 3 minutes each trip, adds up to 20 to 30 minutes of walking per day, and is just exhausting when you are already running on broken sleep.
Think of the 3-station approach the same way you’d think of a home command center: one organized zone for each space where your family actually spends time.
Station 1: Nursery Changing Table
This is your primary station and the most fully stocked one. All 10 items live here. Position the caddy at the right edge of the changing table surface, about 4 to 6 inches back from the edge, so your dominant hand reaches it naturally while your non-dominant hand holds baby. Standard changing table heights run between 34 and 40 inches, so the caddy should sit flush on the table surface rather than on a lower shelf where you’d have to look away to grab items.
Station 2: Living Room or Couch-Side Caddy
A lightweight canvas caddy, something like a Parker Baby Co. rope caddy in a neutral color, lives on the coffee table or alongside the couch where you nurse or feed. This one carries a lighter load: 5 diapers, one wipe pack, one cream tube, and a spare onesie. You’ll use this station more than you expect during the first 8 weeks.

Station 3: Car Caddy
A Keababies compact caddy or a zip pouch in the center console handles changes on the go. Stock it with 4 diapers in the current size, travel wipes, a travel Desitin, and 2 to 3 Ziploc bags for soiled items. The only rule: swap it out every Sunday so you never reach in and find it empty during a trip to the pediatrician.
How to Keep Your Caddy Stocked Without Running Out (Plus, How to Build One as a Gift)
The 10-10 Refill Rule
The simplest restocking habit that actually works: refill the caddy as soon as stock drops to 10 diapers or 10 wipes remaining. That is the threshold. Not when you run out. When you hit 10. That 90-second top-up, done a full day before empty, is what separates a caddy that works every time from one that fails you at the worst moment.
Pair the refill check with your bedroom reset routine each Sunday: count diapers, wipes, and cream levels while you reset the room. Running low? Pull from the bulk storage bin in the nursery closet. Almost out of cream? Add it to your shopping list before you close the caddy up.
You can download the free Diaper Caddy Refill Checklist below (PDF, US Letter, 8.5 by 11 inches) and laminate it to hang inside the nursery closet door. Running a quick scan against that list takes under two minutes and completely eliminates the 3 a.m. “where are the wipes” moment.
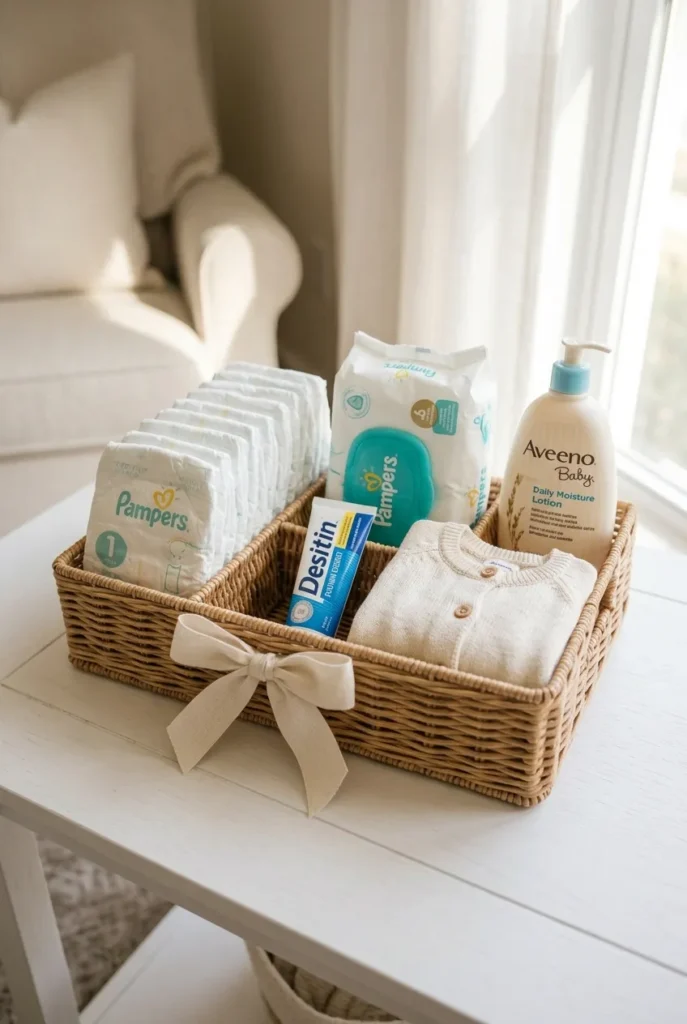
Building a Diaper Caddy as a Gift
A pre-loaded diaper caddy is one of the most genuinely practical baby shower gifts you can give, and almost nobody builds one correctly. The mistake is mixing useful items with “cute but useless” filler. A small candle, a crystal, a decorative ribbon roll: none of that helps at 2 a.m.
Stick to the 4-Slot Caddy Method for the gift build. Use a Parker Baby Co. woven rope caddy or a Keababies organizer in a neutral color (sage, cream, or natural). Pre-fill it with one pack of Pampers Sensitive wipes, 10 size-1 diapers, a travel Desitin, a 1.75-ounce Vaseline tin, one Aveeno Baby lotion, a spare onesie in 3-month size, two Ziploc bags, and a 2-ounce Purell. Total build cost runs $45 to $65 and it is infinitely more useful in the first two weeks than almost any registry item of comparable price.
Frequently Asked Questions About Diaper Caddy Organization
What should I put in a diaper caddy for a newborn?
Pack 10 diapers in size 1, 25 to 30 wipes, a 4-ounce Desitin Maximum Strength, Vaseline, baby lotion, a portable changing mat liner, hand sanitizer, an extra onesie one size up, a burp cloth, and two Ziploc bags. Use the 4-Slot Caddy Method (Change Essentials, Skin Care, Emergency Extras, Cleanup) to organize them so everything is visible and restocking takes under two minutes.
What is the difference between a diaper caddy and a diaper bag?
A diaper caddy stays put. It lives on a changing table, a dresser top, a coffee table, or in a car console. A diaper bag travels everywhere outside the house with you. You genuinely need both. The caddy covers home base and gets restocked from your bulk storage. The diaper bag handles everything out in the world.
How do I organize a diaper caddy on a dresser?
Set the caddy at the center rear of the dresser surface, about 4 to 6 inches from the back wall. Put the tallest items (lotion bottle, wipes pack) in the back row and the most frequently grabbed items (diapers, cream) in the front row. If the dresser top doubles as your main changing surface, add a full-size waterproof changing mat topper, at least 16 by 32 inches, so you have a clean zone around the caddy.
How often should I restock a diaper caddy?
Use the 10-10 Refill Rule: refill as soon as diapers or wipes drop to 10 remaining. Pair that with a weekly Sunday check of cream, lotion, and sanitizer levels. A laminated checklist inside the nursery closet door makes this a 90-second task.
Is a rolling diaper caddy worth it?
Yes, for two-story homes or for parents who move frequently between a main floor and a bedroom. The IKEA RÅSKOG cart (around $20) loaded with small bins works well as a rolling nursery caddy. It also doubles as a station between the bedroom and the bathroom during bathtime routines, which adds real value beyond just diaper changes.
What goes in a diaper caddy for the car?
4 diapers in the current size, travel wipes, a travel-size Desitin, 2 to 3 Ziploc bags for soiled items, and a foldable portable changing mat. Restock the car caddy every Sunday alongside the nursery and living room stations so all three are never simultaneously empty.
What does a minimalist diaper caddy look like?
Two items per slot: diapers and wipes (Slot 1), diaper cream and Vaseline (Slot 2), one spare onesie and one Ziploc bag (Slot 3), hand sanitizer (Slot 4). Nine items total. Fits in the smallest compact caddy and covers every realistic scenario without any clutter.
You Are More Ready Than You Think
Diaper caddy organization does not need to be complicated and it definitely does not need to be expensive. Pick a caddy you actually like, load it with these 10 items in the 4-Slot framework, set up a second station on your living room coffee table, check both every Sunday using the 10-10 Refill Rule, and you are genuinely set.
The middle-of-the-night changes are still rough. Nobody fixes that part. But at least everything you need will be exactly where you left it.

Download the free Diaper Caddy Refill Checklist (PDF, US Letter) at the bottom of this post. Print it, laminate it, and tape it inside the nursery closet door. And if you are working on the rest of the room, the home command center ideas post walks through how to build organized zones throughout the whole house using the same zone-first logic.