Backpack and School Paper Station: End the Morning Scramble
It is 7:42 a.m. One kid has a shoe on. The other is elbow-deep in a heap by the door, hunting for a math folder that was definitely, absolutely right here yesterday. The bus turns the corner in eight minutes. We have lived that exact morning more times than we can count, and the fix turned out to be smaller than we expected. Good backpack station organization is not about a Pinterest-perfect mudroom. It is about giving every bag, folder, and water bottle one obvious home, low enough for a kid to reach and simple enough that they actually use it.
Here is the promise: by the end of this guide you will have a backpack station that holds up past the first week of school, plus a school paper station that stops permission slips from vanishing. We will cover hooks, cubbies, small-space and in-closet setups, a no-drill rental version, and the one routine that keeps the whole thing from sliding back into a pile. Let us get your door working for you.

Where to Put a Backpack Station at Home
Before you buy a single hook, walk your morning route. Watch where the bags actually land. Nine times out of ten the right spot for a backpack station is the first flat surface or wall your kids pass when they walk in, because storage that fights the natural path gets ignored by Wednesday.
The entryway is the classic choice, and for good reason. A short wall by the front door, the side of a hallway, or the gap beside a coat closet all work. No entry to spare? The mudroom, the garage wall by the door to the house, the end of a kitchen counter, or even a corner of the laundry room can hold a perfectly good backpack station at home. The thing is, the prettiest spot loses to the most convenient one every time.
A quick reality check on height. Mount the lowest hook so your kid can hang the bag without a stretch, usually around 40 to 48 inches off the floor for elementary ages. Too high and the bag ends up on the ground anyway.
Backpack Station Ideas by Setup (Pick Your Style)
You do not need a custom build. You need the version that fits your wall, your budget, and your kids. Here are the backpack station ideas that actually hold up, sorted from simplest to most involved.
The Single-Wall Hook Rail
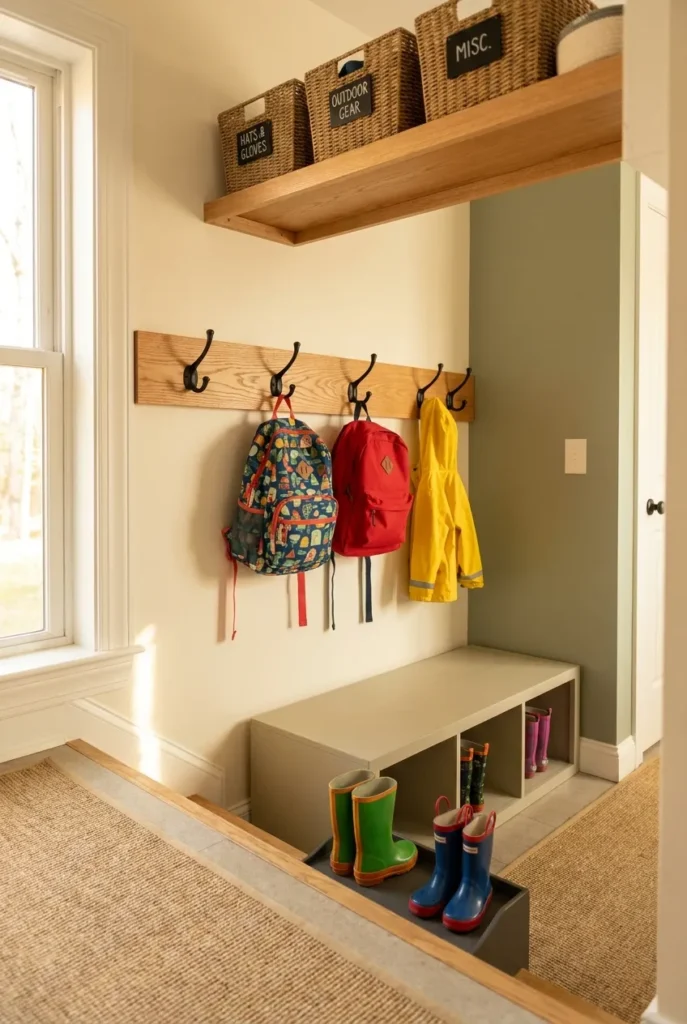
The fastest win, and honestly the one we recommend most. Mount a horizontal board (a 1×4 painted to match your trim works great) and screw in a row of sturdy double hooks, one set per kid. Add an S-hook or two for lunch boxes. Total cost under $25 with hardware-store parts, and you can hang it in an afternoon. This is the backbone of most backpack station diy projects for a reason: it scales as you add kids and it never jams.
The Cubby and Bench Combo
If your kids drop shoes, bags, and sports gear in the same five-foot zone, a bench with cubbies underneath earns its space. The IKEA Trofast frame is a renter favorite here, since the pull-out bins handle cleats, library books, and the random stuff that does not hang. Put hooks on the wall above the bench and you have shoes, bags, and odds-and-ends all in one tidy stack.
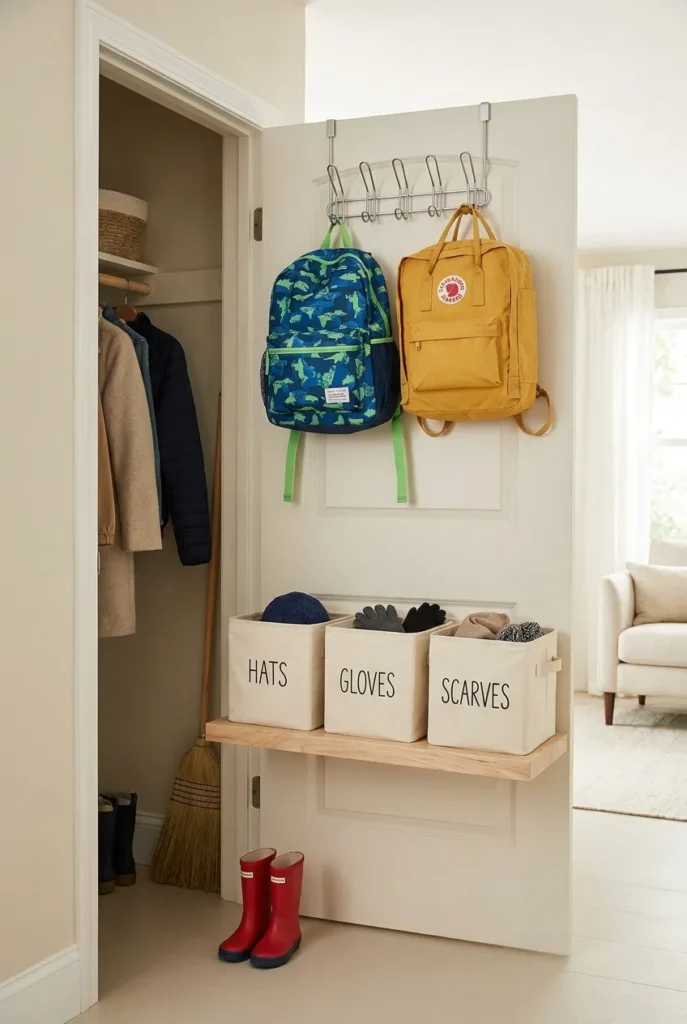
The In-Closet Backpack Station
Short on wall space, or you just do not want bags on display? A backpack station in closet form tucks the whole thing behind a door. Add a low tension rod or an over-the-door rack inside a coat closet, hang the bags there, and you get a clean entryway with the function hidden away. This one is a sleeper hit for small homes.
Small Space and Apartment Backpack Station Ideas
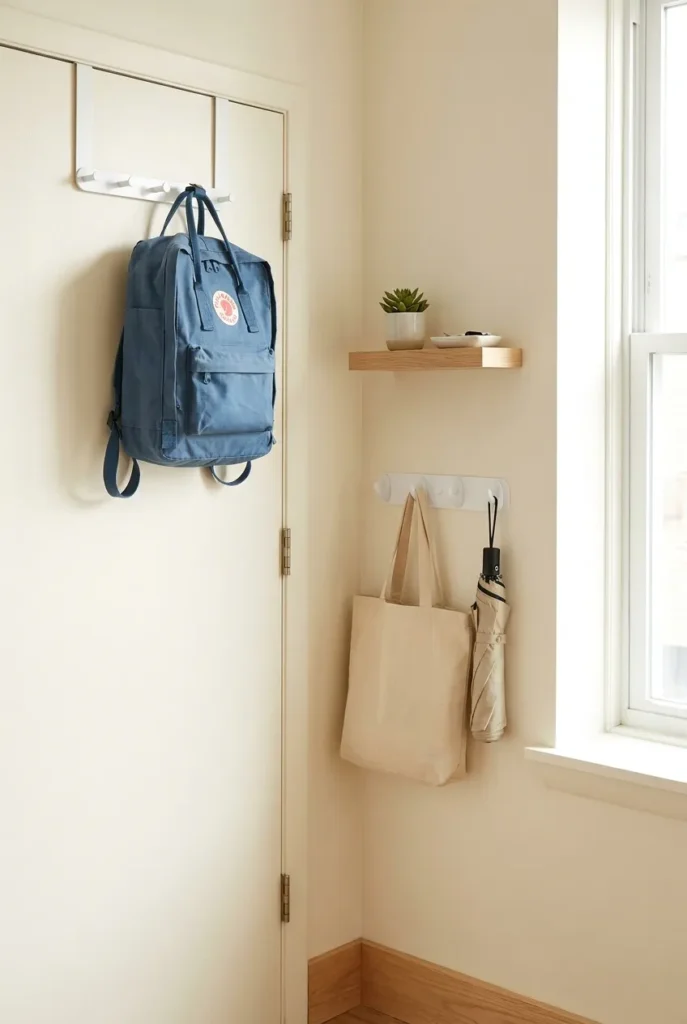
Living in an apartment does not mean a pile by the door is your destiny. A small space backpack station just goes vertical and skips the bulky furniture. Think tall and narrow instead of wide and deep.
A slim over-the-door hook rack turns the back of any door into a backpack station for kids, no floor space lost. A magnetic or peel-and-stick hook strip beside the entry holds lighter bags. And a single floating shelf with three hooks underneath gives you a drop zone in a corner that was doing nothing before.
The No-Drill Rental Version
Renters, this one is for you. You can build a full backpack station for kids without putting a single hole in the wall. Command hooks (the 3M brand holds up to several pounds each when you follow the weight rating) handle backpacks beautifully. An over-the-door rack needs zero hardware. A freestanding coat tree with a low branch works for little ones. Lead with damage-free and you keep your deposit and your sanity.
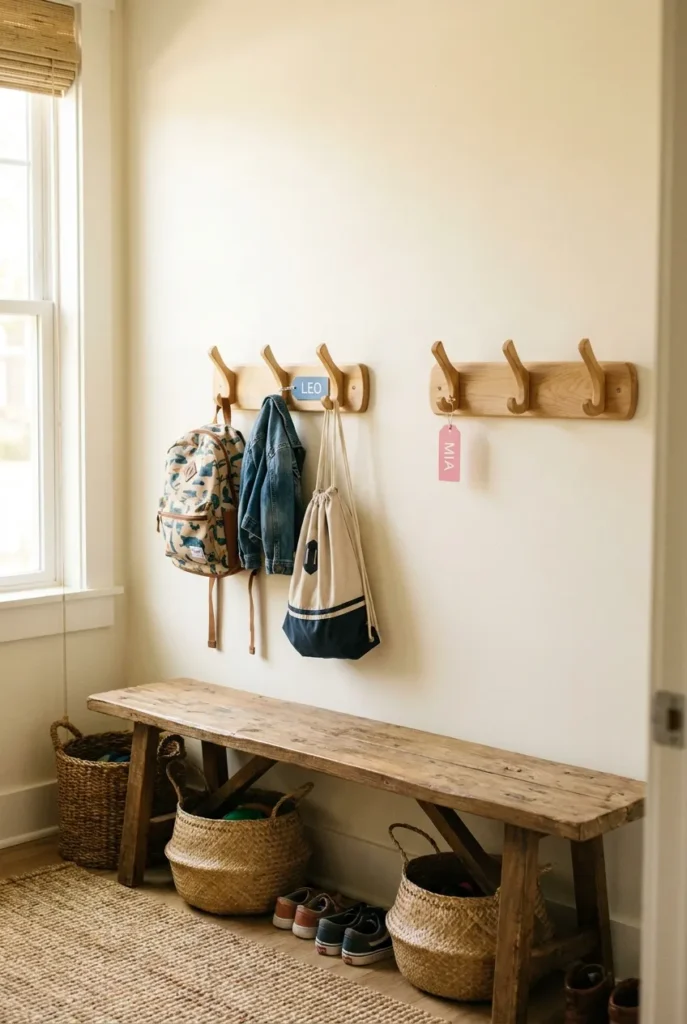
The 3-Hook Morning Launchpad (Our Original System)
Here is the framework that turned our chaotic door into a station the kids actually run themselves. We call it the 3-Hook Morning Launchpad, and it is built on one idea: every kid gets exactly three hooks, and each hook has a job. One hook for the backpack. One hook for the jacket or coat. One hook for the “tomorrow bag” (gym clothes, library books, the show-and-tell item, whatever has to leave with them next).
Why three? Because a kid can remember three. Give them a wall of ten hooks and nothing has a home. Give them three labeled jobs and the system runs on autopilot. We tested this in our own hallway last fall, and by week two the seven-year-old was resetting his own launchpad without a single reminder. To be fair, the four-year-old still needed help, but even she knew which hook was hers.
Label each hook set with the kid’s name or, for the little ones who cannot read yet, a color or a simple picture icon. Visual labels are the quiet hero of any backpack station for kids.
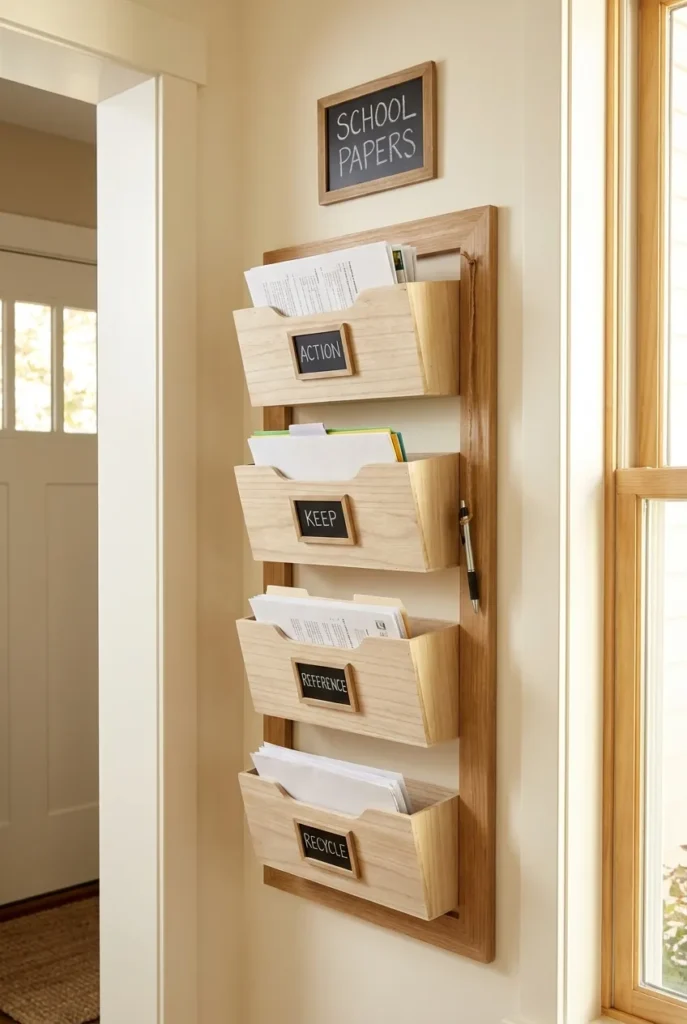
Build a School Paper Station (The Part Everyone Skips)
This is where most backpack stations fall apart. You can hang the bag perfectly and still drown in paper. Permission slips, graded math tests, the flyer about picture day, three drawings that must be saved or there will be tears. A real school paper station gives every piece of paper a fast decision and a destination, so nothing important ends up crumpled at the bottom of a backpack until it is two weeks too late.
Set up four labeled spots near your station. We use a small wall file or a set of stacked trays:
- Action (needs a signature, money, or a reply, deal with it tonight)
- Keep (report cards, art worth saving, anything sentimental)
- Reference (the lunch menu, the sports schedule, the class contact list)
- Recycle (everything else, and it is most of it)
The rule that makes it work: paper gets sorted the moment the backpack lands, not later. One touch, one decision. If you want a deeper version of this one-touch habit, our one-touch rule decluttering method walks through it for the whole house. A “Keep” box per kid, refreshed once a year, saves the truly special stuff without burying your counter in macaroni art.
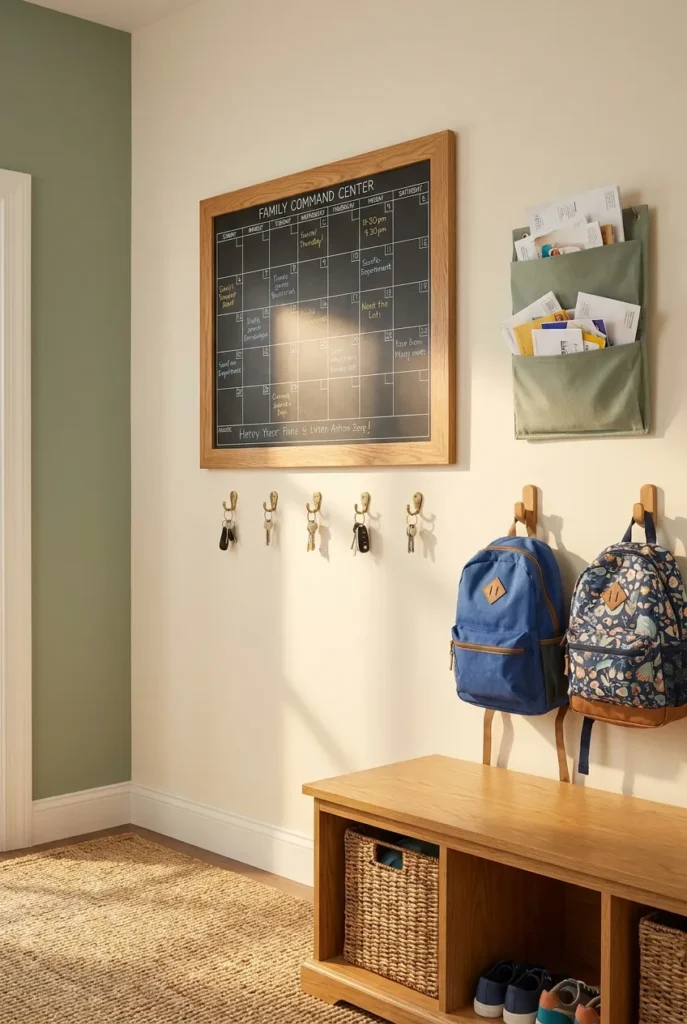
Add a Command Center (Where Bags Meet the Calendar)
Once the bags and paper have a home, the natural next step is tying it to the family schedule. A backpack station that sits under a small command center (a calendar, a few key hooks, a mail basket) becomes the spot where the whole household syncs. The permission slip gets signed, the field-trip date hits the calendar, and the bag is right there to receive it.
You do not need a whole wall. A chalkboard calendar, a clip for the week’s flyers, and a hook for keys above the backpack rail does the job. If you want the full build, our guide to a family command center wall shows how to lay one out without it taking over the entryway.
Don’t Forget the Lunch and Water Bottle Zone
A backpack station that ignores lunch gear is half a system. The lunch box, the reusable water bottle, the snack bag, they all need a landing spot too, ideally near the kitchen so packing is a two-minute job, not a scavenger hunt.
Add an S-hook on the rail for the empty lunch box and a small bin for clean water bottles. Better yet, keep the grab-and-go snacks sorted so kids can pack their own. Our snack drawer organization system makes the morning lunch-pack genuinely fast, and it pairs perfectly with a backpack station at home.

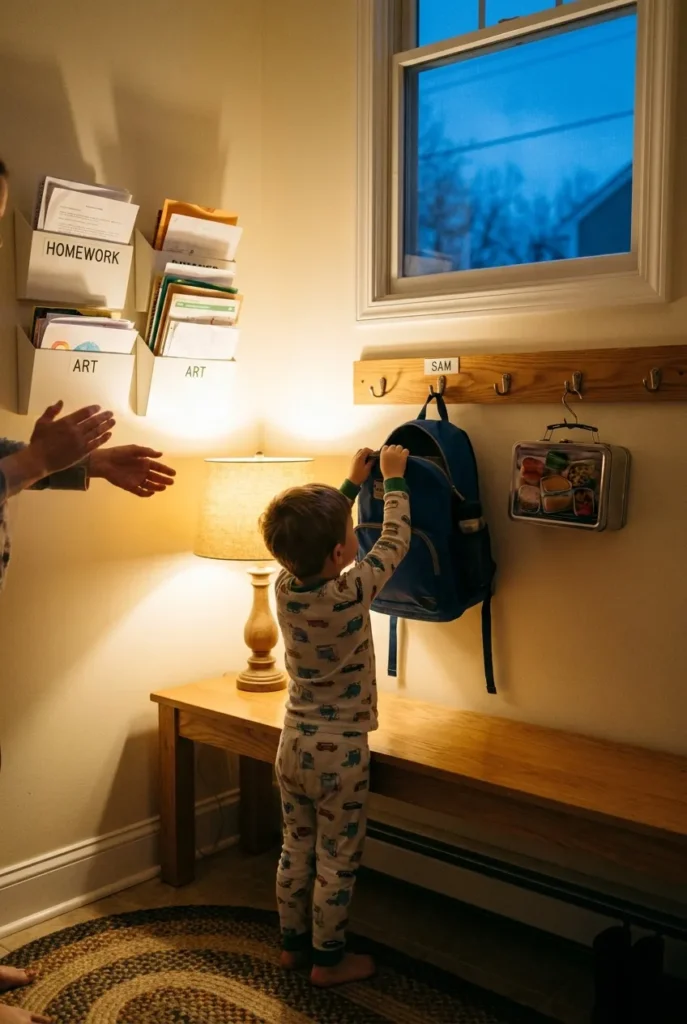
End-of-Summer Setup: Build the Habit Before the Bus Comes
The secret nobody tells you: a backpack station works because of the routine, not the rack. Set it up two weeks before school starts, in mid-August, and practice the loop while mornings are still low-stakes. Walk in, hang the bag on its hook, sort the paper into its tray, drop the lunch box on the S-hook. Three steps, every single day.
Do a quick reset each evening too. We do ours right after dinner: bags repacked, water bottles in the bin, tomorrow’s “launchpad” hook loaded. It takes about four minutes and it buys back those frantic eight minutes at 7:42 a.m. Worth it.
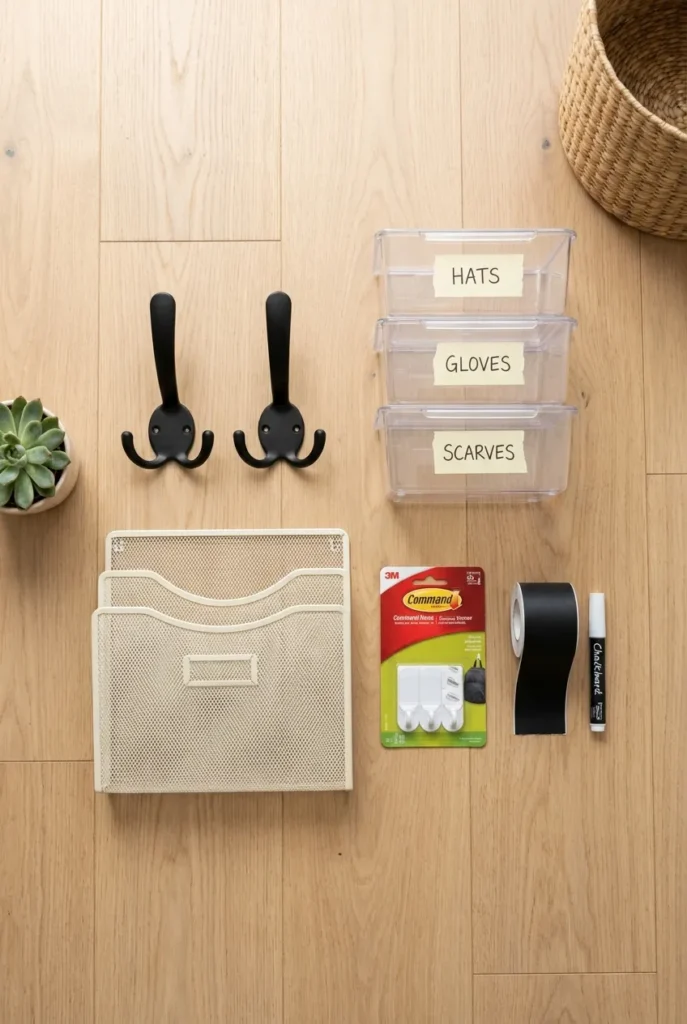
A Few Product Picks Worth the Money
You do not need much, but a few pieces pull their weight. Sturdy double hooks (around $4 to $8 each) beat single hooks because a loaded backpack needs two points of contact. The IKEA Trofast frame (roughly $40 to $80 depending on size) handles the messy overflow. Command hooks keep renters drilling-free. For paper, a simple wall-mounted file holder under $20 runs the whole school paper station.
Skip the pricey custom lockers unless you have the wall and the budget to spare. According to the U.S. Consumer Product Safety Commission, wall-mounted furniture and heavy fixtures should be properly anchored, so use the right wall anchors for your hook board and you will be set for years. For age-appropriate routines and chore expectations, the HealthyChildren.org guidance from the American Academy of Pediatrics is a solid, non-commercial reference.
Frequently Asked Questions
How do I set up a backpack station in a small space?
Go vertical. A slim over-the-door hook rack or a peel-and-stick hook strip turns a door or a narrow wall into a full backpack station with zero floor space. Add one small floating shelf above for hats and gloves and you have a complete drop zone in a corner that was empty before.
What is the best height for a backpack station for kids?
Mount the lowest hook so your child can hang the bag without reaching up, which is usually 40 to 48 inches off the floor for elementary ages. The bag should hang clear of the floor when loaded. If a kid has to stretch or jump, the backpack ends up on the ground instead of the hook.
Can I make a backpack station without drilling holes?
Yes. Command hooks (the 3M brand, used within the weight rating) hold backpacks well, an over-the-door rack needs no hardware at all, and a freestanding coat tree works for little kids. This makes a no-drill backpack station perfect for renters and dorms.
Are there good IKEA options for a backpack station?
The IKEA Trofast frame with pull-out bins is a longtime favorite for a cubby-and-bin setup, and a simple IKEA peg rail or hook rack handles the hanging side. Mix a Trofast for shoes and overflow with a wall rail for bags and you have a full IKEA backpack station for not much money.
How do I keep my kids actually using the backpack station?
Keep it to three hooks per kid (the 3-Hook Morning Launchpad), use visual labels for non-readers, and build a quick evening reset into your routine. The system sticks when it is simple and low enough to reach. Practice the loop for two weeks before school starts so it is a habit, not a chore, by day one.
Where should I put a backpack station if I have no entryway?
The mudroom, the garage wall by the door, the end of a kitchen counter, or a corner of the laundry room all work. Pick the first spot your kids pass when they walk in, since the most convenient location always beats the prettiest one.
What do I do with all the school paper?
Build a school paper station with four labeled trays: Action, Keep, Reference, and Recycle. Sort each paper the moment the backpack lands, one touch and one decision, so permission slips and forms never get lost at the bottom of a bag.
You’re Eight Minutes Closer to Calm Mornings
A backpack station is one of those small projects that pays you back every single school day. Hang a few hooks, set up four paper trays, give each kid three labeled jobs, and practice the loop before the bus shows up in August. That is the whole thing. So here is our question for you: which wall in your home is about to become your new launchpad? Start there this weekend, and next fall that 7:42 a.m. scramble might just become the calmest part of your morning.
This article is general home-organization information, not professional advice. For product safety and child-routine guidance, consult the manufacturer instructions and a qualified professional.