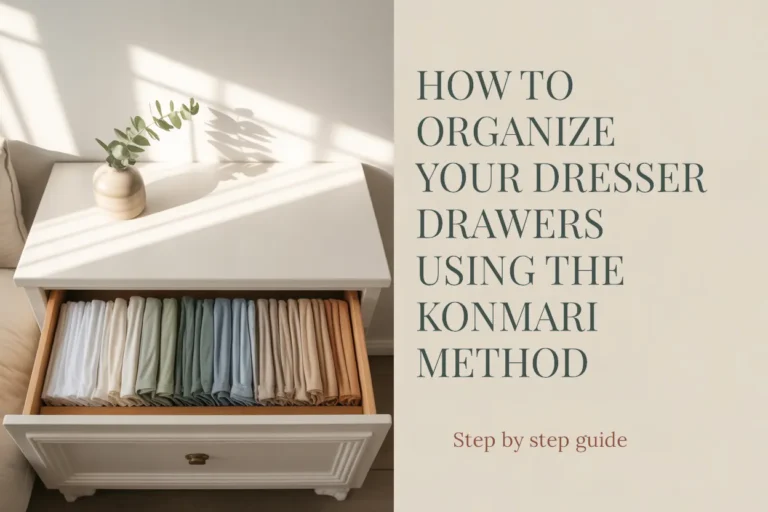
Toiletry Drawer Organization: A Renter-Friendly System That Works
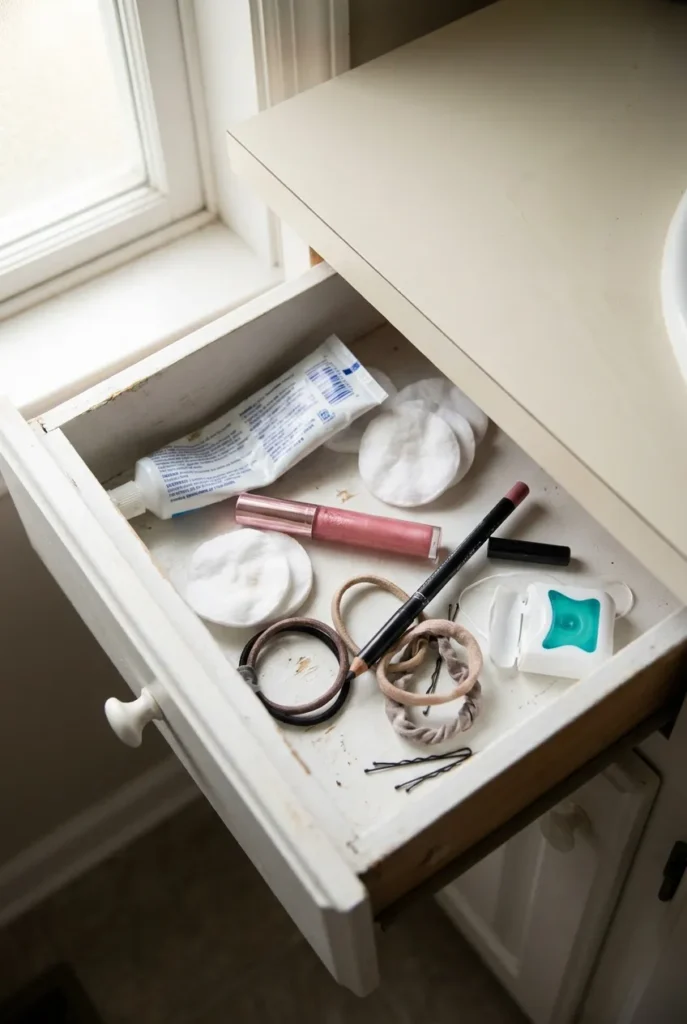
You open the bathroom drawer first thing in the morning and immediately wish you hadn’t. A lip gloss rolls into a tangle of hair ties. An almost-empty moisturizer tips over a pack of floss. Somewhere in the back, behind three travel-size shampoos from a hotel you can’t name, is the tweezers you needed four minutes ago. You find a bobby pin instead. You leave the drawer exactly as it is and tell yourself you’ll fix it this weekend.
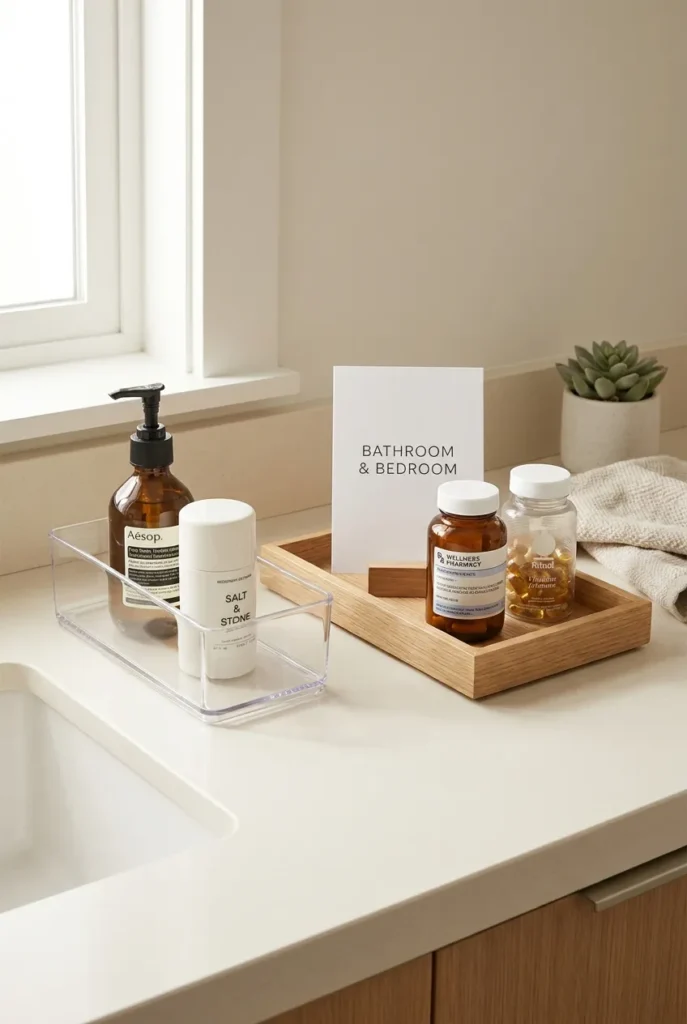
Sound familiar? Here’s the thing most toiletry organization ideas online won’t admit: you’re not the problem. Your drawer just doesn’t have a system. Most bathroom organization guides show you a pristine, evenly lit vanity with six products artfully arranged inside it. Real life has 40 products, two people’s routines, expired SPFs, and a deodorant that rolls every single time the drawer opens.
This guide is for renters specifically. No drilling, no adhesive that destroys a deposit, no permanent modifications. We’re building a complete toiletry drawer organization system using one repeatable framework, products under $30 total, and zero tools. By the end, you’ll have a method that holds up past Sunday. Let’s get into it.
Why Bathroom Drawers Always Turn Into a Mess (And Why It Has Nothing to Do With You)
The average bathroom vanity drawer measures about 18 inches wide and between 5 and 7 inches deep. That sounds like plenty of room until you realize one thing: a rectangle with no internal structure fills the same way a junk drawer does. One item at a time, each one bumping the last one a little further back, until the whole system is a single flat layer of chaos you dig through every morning.
Round products roll. Tall products tip. Small products disappear under large ones. Without divisions, the best toiletry organization ideas in the world collapse the first time you’re in a hurry and shove something back in.
The second problem specific to renters: most bathroom drawer organization ideas assume you can modify the space. Built-in insert trays. Adhesive drawer liners that grip permanently. Custom-cut acrylic panels. None of those work when you need your deposit back at the end of the lease.
The good news is that the fix doesn’t require any of that. It requires a method, not modifications. And that method is the thing we’re building here.
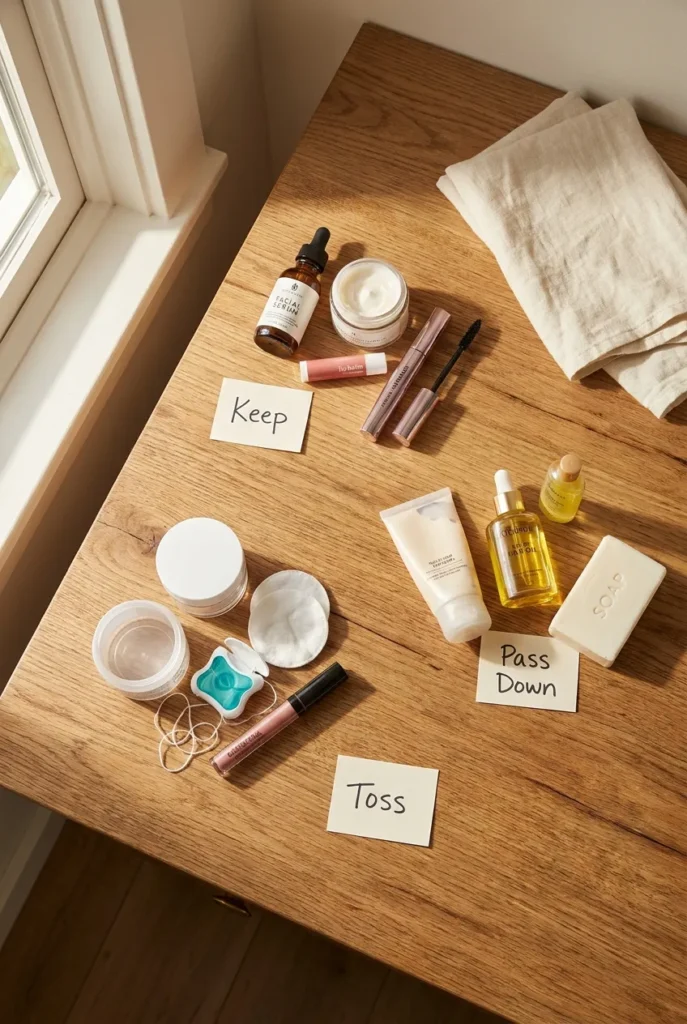
Before You Buy a Single Bin: The 10-Minute Drawer Purge
Every single toiletry organization guide skips this step or buries it at the end. We’re doing it first, because if you buy a set of acrylic bins and fill them with expired sunscreen and hotel shampoo, you’ve spent $14 to organize clutter.
Pull everything out of the drawer. Yes, everything. Lay it all on the counter. Then sort into three piles: keep, donate or pass down, and toss.
Here’s what goes in the toss pile without hesitation:
- Any mascara older than three months (the M symbol on the bottom of the tube tells you: 3M means three months after opening)
- Expired sunscreens and SPF moisturizers, especially anything left over from last summer
- Travel-size products from a hotel stay you can’t specifically recall
- Anything sticky, leaking, or missing a cap for more than a week
- Duplicate backup products when you already have a backup of the same thing in the drawer
- Perfume samples you’ve genuinely never tried
For the donate or pass down pile: unopened, unexpired products in their original packaging can go to a local shelter, a Buy Nothing group on Facebook, or a neighbor. Don’t toss what someone else can use.
Now wipe the interior of the empty drawer with a damp cloth and let it dry completely before adding any organizers. This matters more for renters than it sounds. Non-adhesive organizers grip better on a clean, dry surface, and a dry base also prevents mildew under bins in a humidity-prone bathroom.
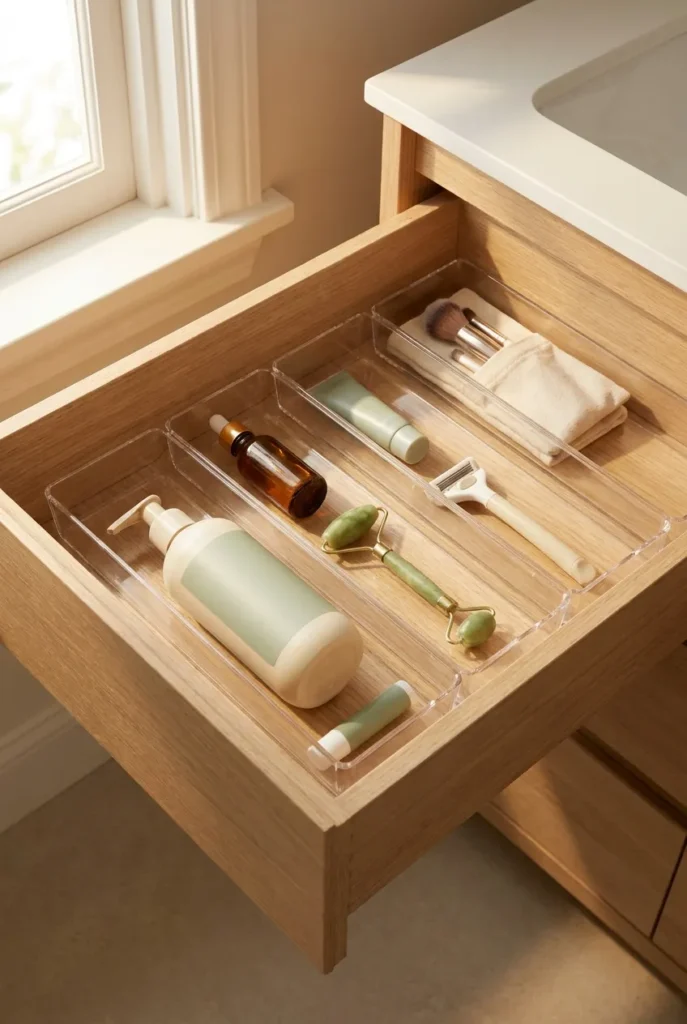
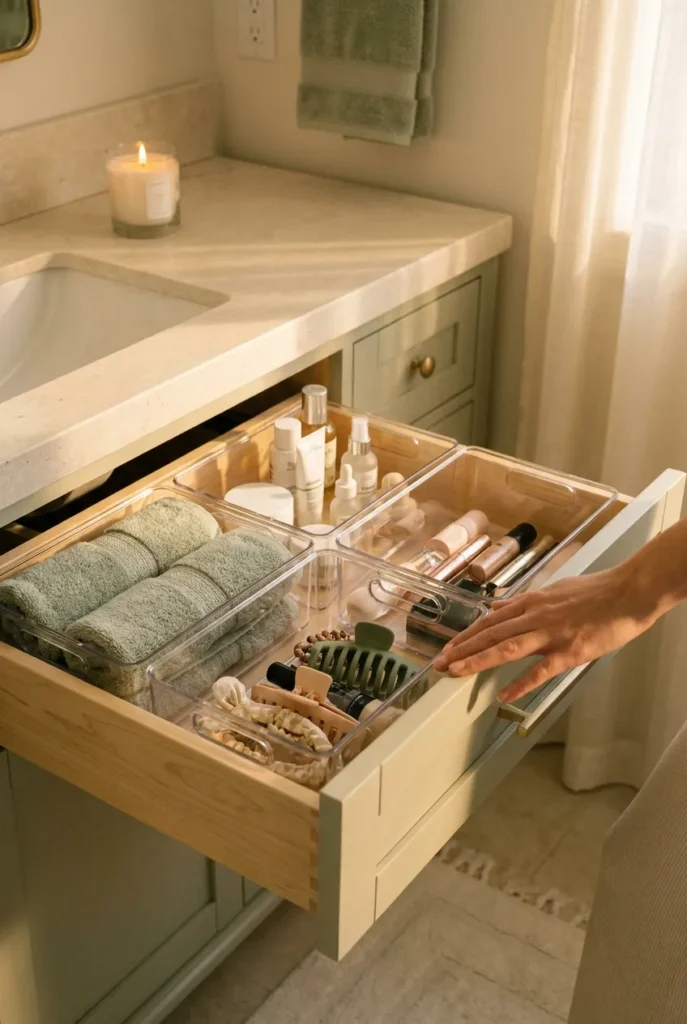
Introducing the 4-Zone Vanity Drawer Method
Here’s where most toiletry organization ideas get it wrong. They organize by product type. Skincare in one bin, hair stuff in another, makeup in a third. That sounds logical until you realize your SPF moisturizer is skincare but you also reach for it every single morning, while your eye cream is also skincare but you use it twice a week on a good day. Product type doesn’t predict how often you need something. Frequency does.
The 4-Zone Vanity Drawer Method divides your drawer (or drawers, if you have a stacked vanity) into four zones based on one question: how often do you actually reach for this?
Zone 1: Daily (morning and night non-negotiables)
Zone 2: Weekly (treatments and extras you use several times a week)
Zone 3: Backup and Refill Stock (one-of-each reserves)
Zone 4: Beauty and Special Occasion Tools (the stuff you need but not every day)
The placement rule is simple: Zone 1 always lives closest to the front of the drawer. Zone 4 lives at the very back, or in a second drawer entirely. The items you reach for every morning should never require digging.
This method works for a single tiny drawer above a pedestal sink and for a three-drawer vanity cabinet. It also handles the shared bathroom situation, which we’ll cover in a dedicated section because it is genuinely one of the most common reasons bathroom drawer organization ideas fail for couples and roommates.
Zone 1 and Zone 2: What Goes Where and Why It Matters
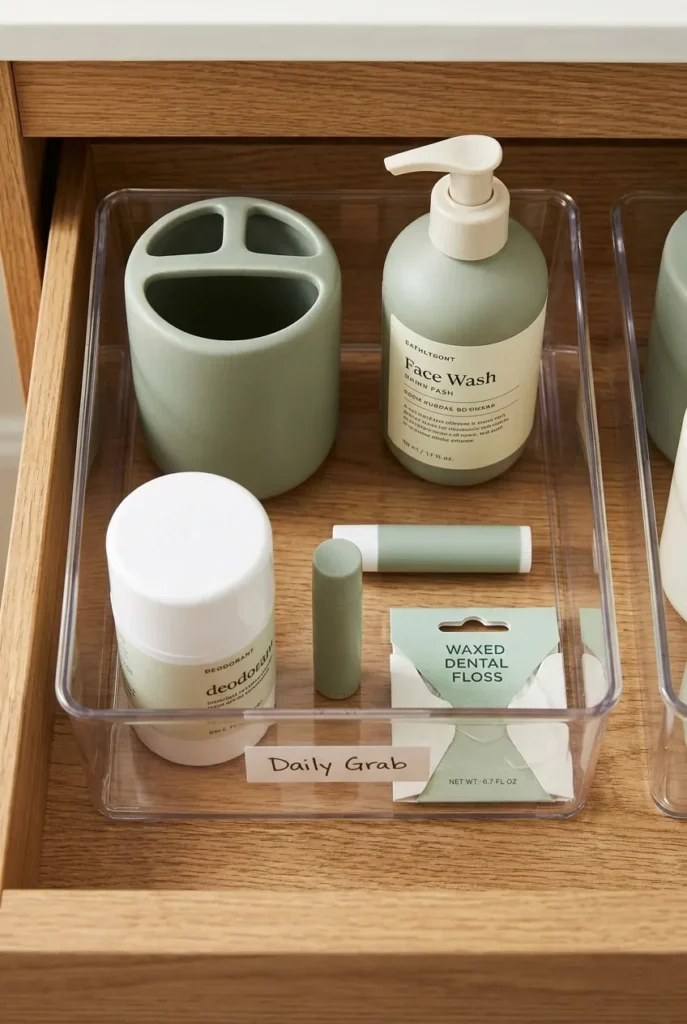
Zone 1: Your Daily Grab Items (Front of the Drawer)
Zone 1 is non-negotiable real estate. It holds only what you touch every single morning and every single night. Think facial cleanser, SPF moisturizer, deodorant, lip balm, floss, and your toothbrush if you store it in the drawer. That’s roughly six to eight items maximum. If your Zone 1 has more than eight items, you’ve moved Zone 2 products into prime territory, and the system gets crowded fast.
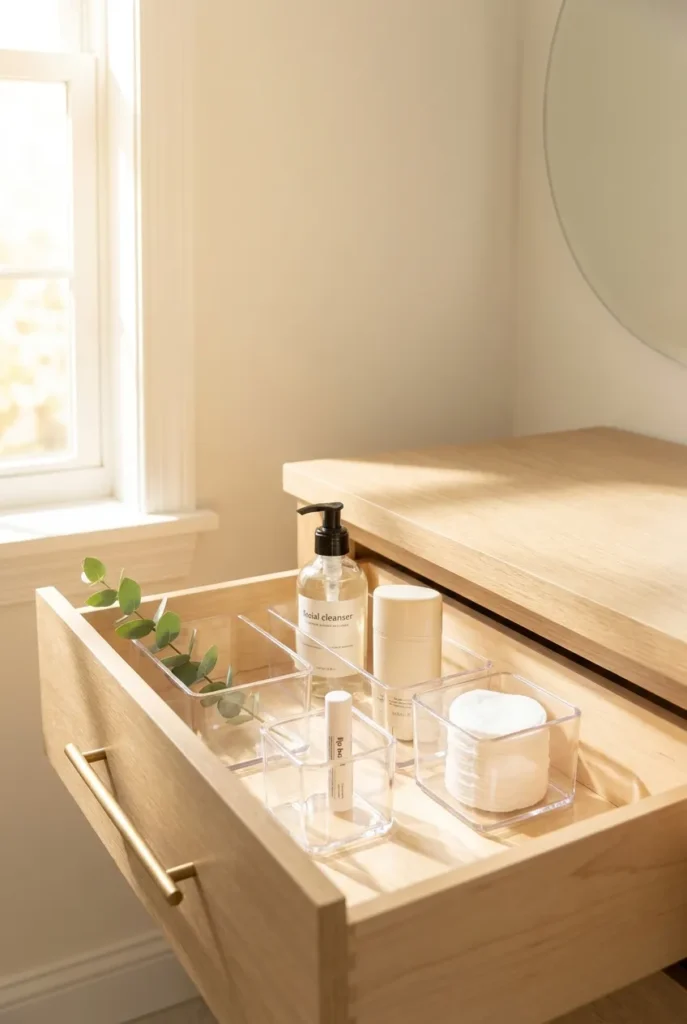
The right organizer size for Zone 1 is a 6-inch by 3-inch divided acrylic bin, or two of the small 4-inch-by-4-inch slots from the mDesign Drawer Organizer Set. Target Brightroom carries a nearly identical version for under $12 that fits most standard 18-inch bathroom drawers without sliding. Each slot gives one product a home, which means it always goes back in the same spot without thinking about it.
To be fair, the first time I tried the 4-Zone method in a rental bathroom in a one-bedroom apartment, I put nine items in Zone 1 and wondered why it still felt cluttered. Editing that down to six changed everything.
Zone 2: Your Weekly Routine (Right Behind Zone 1)
Zone 2 sits directly behind Zone 1 in the same drawer, or in the second drawer down if your vanity is stacked. This is where face masks, exfoliating serums, an eye cream you use several times a week, and dry shampoo live.
Zone 2 products earn their spot based on a single test: did you reach for this at least three times this week? If yes, Zone 2. If no, Zone 3. That rule sounds rigid written out, but in practice it just means your once-a-month retinol serum isn’t hogging real estate next to your daily face wash anymore. The test resets each week, and if something hasn’t been reached for in two weeks, it moves back. Simple enough to run in your head while you’re brushing your teeth.
Zone 3, Zone 4, and the Shared Bathroom Fix Nobody Talks About
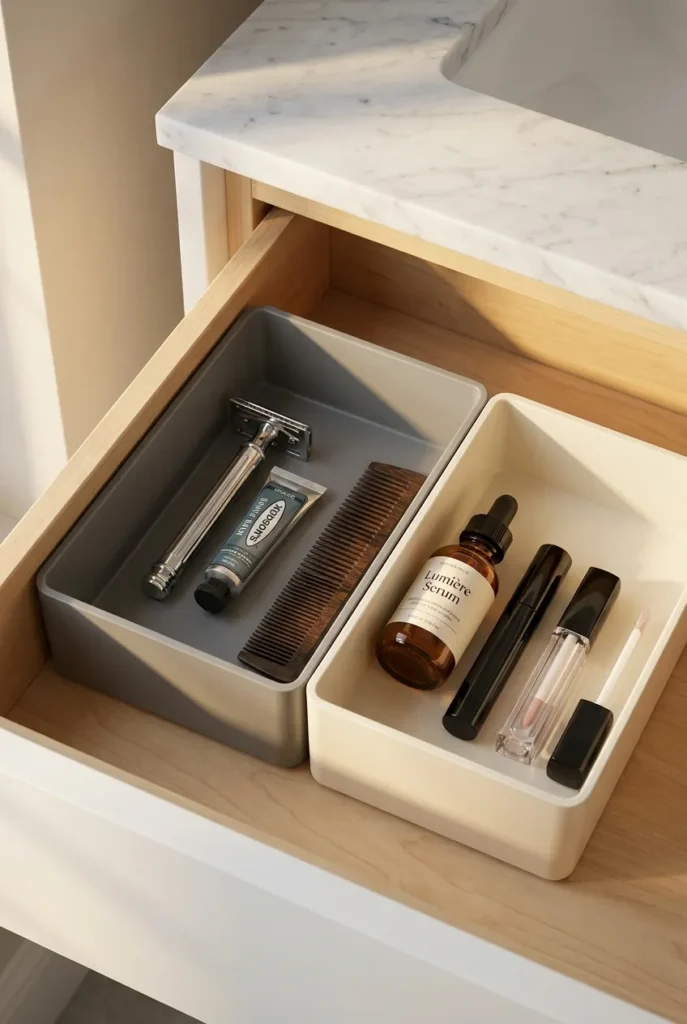
Zone 3: Your One-of-Each Backup Rule
Zone 3 is your restocking station. One backup tube of toothpaste. One spare razor. One travel-size version of your daily face wash for gym bag days. The non-negotiable rule here: one of each, and only one. Zone 3 is not a stockpile. The moment a backup gets opened and enters daily rotation, it becomes a Zone 1 or Zone 2 product, and you replace the backup.
A deep bathroom drawer organizer with a removable tray works perfectly for Zone 3 because you can lift the tray out, grab a refill, and slide it back without disrupting the zones in front of it. The iDesign Linus Deep Drawer Organizer (available on Amazon, around $16 for a two-piece set) has a 3.5-inch depth that holds full-size backup bottles upright without tipping. If your drawer measures deeper than 4 inches from the interior floor to the top of the open frame, that extra depth is where Zone 3 earns its place vertically rather than eating horizontal space.
Zone 4: Beauty Tools and Special Occasion Products
Zone 4 lives at the very back of the drawer or in a separate small bin on a shelf if the drawer is too shallow. The weekend eyeshadow palette. The lash curler. The face roller you genuinely use but only on Sunday nights when you have actual time. Specialty tools. Items you’d miss if they were gone but don’t need on a Tuesday morning at 7:15 a.m.
For Zone 4 products with long handles (a brow brush, a lash wand), a slim 2-inch-by-6-inch bin keeps them upright and visible without rolling.
The Shared Bathroom Version (And Why Most Systems Fall Apart Here)
This is the gap in almost every bathroom drawer organization ideas guide out there, and it’s the gap that matters most for couples and roommates.
The classic mistake is trying to organize two people’s products into one system with no clear boundary. Someone’s razor ends up in someone else’s skincare zone. A shared Zone 1 gets crowded with 16 products instead of 8. The whole system collapses inside a week, and neither person is sure whose fault it is.
The fix is structural. If you have two drawers, one person gets one drawer, full stop. Each drawer runs its own independent 4-Zone Vanity Drawer Method. If you only have one drawer, split it down the middle with a visual divider. The mDesign Organizer Set includes bins that sit flush against each other with no gap, creating a clean visual line that reads as a boundary without any adhesive or modification. Label each side with a small piece of washi tape on the front of the bin if you want, or just let the product styles do the talking.
Shared toiletry organization ideas work best when each person’s zone is sovereign. Respected, clearly defined, and not up for negotiation on the deodorant placement.
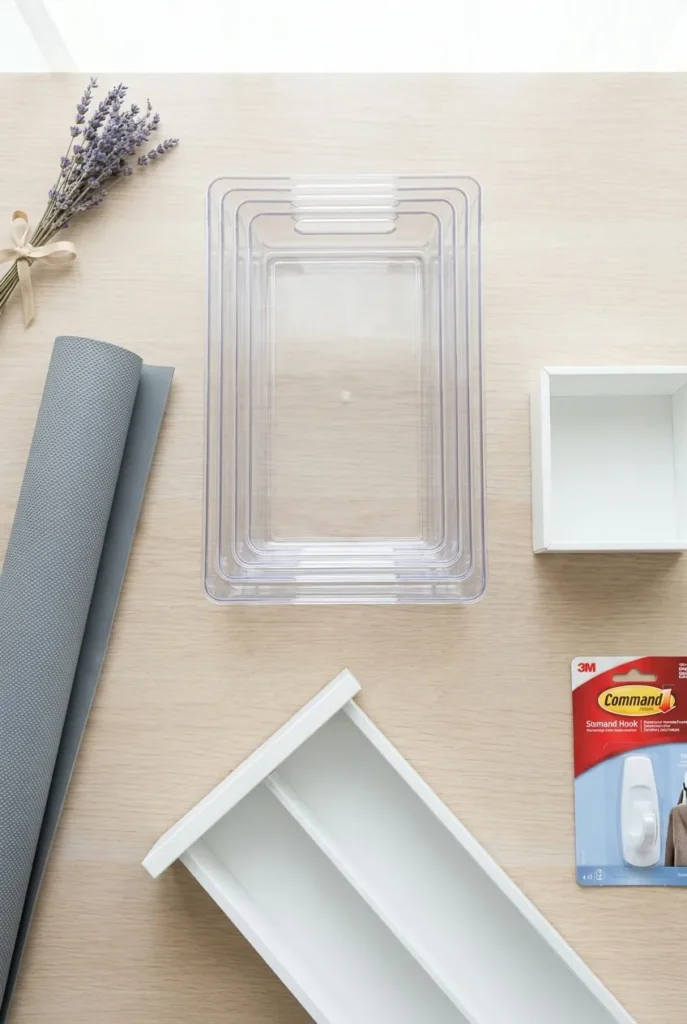
The Best Drawer Organizers for Renters (Nothing Gets Glued, Drilled, or Attached)
Your framework is set. Now the gear. As a renter, your whole toiletry organization setup lives on one rule: nothing gets permanently attached to the drawer surface. The good news is that the best bathroom drawer organizers don’t need attachment. They hold position through weight, snug sizing, and a non-slip base layer.
Here’s what to look for and specifically what to buy:
Clear acrylic bins (non-adhesive): The Target Brightroom 4-Piece Organizer Set, around $9, is the best cost-effective starting point. Four different sizes, all clear, all free-standing. They fit flush in a standard 18-inch vanity drawer and don’t shift during normal use once the drawer is loaded.
Expandable drawer organizers: The mDesign Expandable Drawer Organizer adjusts from 12 to 21 inches. That means it fits your current rental bathroom and the next one without buying a new set. No tools, no adhesive, around $13 on Amazon.
Non-adhesive drawer liners: A rubber shelf liner cut to fit the interior floor of your drawer keeps individual bins from sliding without touching the drawer surface chemically. The Amazon Basics non-adhesive shelf liner, around $8 for a 12-inch-by-10-foot roll, is one I’ve used in three different apartments across four years and peeled off each time with zero residue.
Stackable options for deep drawers: If your drawer interior measures more than 4 inches deep, use vertical space. The IKEA KUGGIS insert box in the 7-by-9-inch size (under $5) stacks inside a deep drawer and doubles your storage capacity with no drilling. It slides in and out of the drawer freely, which also makes it easy to clean the drawer floor underneath it, something most people never do until they move out and discover what was living under the bins.
For small products that escape every system: One 3-inch-by-3-inch catch-all bin in a corner handles hair ties, a spare bobby pin, the errant earring that found its way into the bathroom. It’s still a zone. It’s the miscellaneous zone, and every drawer deserves one planned corner for it rather than letting miscellany colonize Zone 1.
For items that overflow the drawer entirely: A 3M Command Large Hook rated for 7.5 pounds mounted on the inside of the cabinet door below the drawer holds a hanging toiletry bag or a small foldable caddy for overflow items. It comes off with the tab pull, leaves no residue, and costs about $4. No drilling, fully renter-friendly.
For everything outside the drawer itself, how to organize under the bathroom sink is the natural next step. And if your bathroom storage goes beyond the vanity entirely, small bathroom storage ideas that skip the drill covers wall-adjacent and over-door options that renters can actually use without risking the deposit.
What NOT to Store in a Bathroom Drawer (This One Surprises Most People)
Every toiletry organization ideas guide tells you what to put in. Almost none of them tell you what shouldn’t be in there at all. A few of these will genuinely change how you think about bathroom storage.
Prescription and over-the-counter medications: The FDA recommends against storing most medications in a bathroom due to heat and humidity. Steam from your shower degrades pills, affects liquid medications, and speeds up the breakdown of topical creams faster than the printed expiration date assumes. According to FDA guidance on safe medication storage, a cool, dry location away from the bathroom is the safer option for most medications. A bedroom nightstand drawer, a locked box in a hall closet, or a dedicated shelf in a dry pantry all work better.
Perfume and fragrance products: Heat and light break down fragrance molecules. A bathroom drawer near a running shower is one of the worst places to store a perfume bottle you want to smell the same in six months. A bedroom dresser drawer or a cool, dark cabinet keeps fragrance stable far longer.
Nail polish: Same issue as perfume. Heat causes polish to separate, thicken, and clump. A bedroom drawer or a cool cabinet away from bathroom humidity is better for anything you want to still use in three months.
Vitamins and supplements: Similar degradation mechanism. Heat and moisture reduce potency before the label expiration date. A dry pantry shelf is better for supplements than a bathroom cabinet or drawer.
Aerosol cans stored near heat sources: Dry shampoo, hairspray, and similar aerosols are fine stored in a bathroom drawer if they’re away from heated styling tools. The U.S. Consumer Product Safety Commission advises keeping aerosols away from heat sources to prevent pressure buildup. Store aerosol products in a separate section of the drawer from curling iron storage areas or heated caddy accessories.
The pattern here is the same across all of them: humidity and heat are the bathroom drawer’s two biggest enemies for anything beyond daily-use toiletries.
The 5-Minute Sunday Drawer Reset (This Is What Actually Keeps the System Going)
Any toiletry organization ideas guide that gives you a setup with no maintenance plan is leaving out the most important part. Systems don’t fall apart because people are lazy. They fall apart because there’s no reset mechanism built in.
Here’s the reset I run every Sunday evening, and it takes exactly five minutes if the 4-Zone framework is already in place.

Step 1: Zone check (90 seconds). Open the drawer and scan all four zones. Anything that migrated out of its zone during the week goes back. A Zone 2 serum that ended up in Zone 1. The lip balm that somehow landed in Zone 3 territory. This takes one minute once you know where things belong.
Step 2: Expiry and empty sweep (2 minutes). Pick up every product in Zone 1 and Zone 2. Anything that ran out this week gets pulled out and its backup from Zone 3 moves forward. Anything that feels sticky, nearly empty, or past its open-by date goes in the trash. Replace Zone 3 backups on your grocery list.
Step 3: Wipe-down (90 seconds). A single paper towel or a reusable cotton cloth run across the interior of each bin takes 90 seconds and keeps the drawer from developing that sticky residue that makes organizing feel harder than it is.
That’s the full reset. It sounds small because it is small. But it’s the difference between a system that holds for one weekend and one that holds for a year.
If you want to extend this kind of reset logic to the rest of your bathroom, bathroom drawer organization basics covers the full vanity setup beyond just the toiletry drawer, including hair tools and countertop zones.
Frequently Asked Questions
How do you organize toiletries in a drawer?
Start with a purge to remove expired and unused products, then apply the 4-Zone Vanity Drawer Method: Zone 1 (daily items) at the front, Zone 2 (weekly) behind it, Zone 3 (backups) in the middle back, and Zone 4 (special tools) at the rear. Use non-adhesive clear acrylic bins to hold each zone in place without modifying the drawer surface.
Are drawer organizers actually worth buying?
Yes, for one specific reason: they give round, rolling, and small products a fixed home. Without them, every time you open and close the drawer the contents shift. The result is that you spend mental energy finding things every morning instead of reaching for them automatically. A $9 set of clear acrylic bins from Target Brightroom is enough to start. You don’t need a custom insert.
What should not be stored in a bathroom drawer?
Prescription medications, vitamins, perfumes, nail polish, and aerosol cans near heat sources should all be stored outside the bathroom when possible. The FDA specifically flags the bathroom as a high-heat, high-humidity environment that degrades most medications faster than a cool, dry room would. A bedroom nightstand or pantry shelf is a better storage location for anything that isn’t a daily-use toiletry.
What are the best drawer organizers for a bathroom vanity?
For most standard 18-inch vanity drawers: the Target Brightroom 4-Piece Set for a budget-friendly start (around $9), the mDesign Expandable Drawer Organizer for a rental-safe adjustable option (around $13), and the iDesign Linus Deep Drawer Organizer for drawers deeper than 4 inches (around $16 for two). All three are non-adhesive and require zero tools to install.
How do I set up toiletry organization ideas for a bathroom vanity with only one small drawer?
Prioritize Zone 1 ruthlessly. In a single small drawer, you only have room for Zone 1 (daily) and a small Zone 2 section at the back. Zone 3 backups move to an under-sink bin or a small basket on a shelf. Zone 4 beauty tools can live in a cosmetic bag stored elsewhere. A single deep drawer organized by frequency beats a cluttered three-drawer vanity organized by product type.
Can I use these toiletry organization ideas in an RV or camper bathroom?
The 4-Zone method works in any drawer regardless of size. For an RV or camper, where drawers are often shallower than 3 inches and narrower than 12 inches, stick to Zone 1 items only in the drawer, keep a zip-around toiletry bag for Zone 2 and Zone 3 items, and use 3M Command Hooks on the inside of cabinet doors for overflow.
How often should I clean out my bathroom drawer?
A 5-minute weekly reset keeps the system current. A full declutter pass (everything out, wipe down, expire check on all products) every three months aligns with the natural turnover rate of most skincare and makeup products.
The Easiest Thing You Can Do for Your Morning Routine
Here’s what actually happens once you build a working toiletry drawer organization system: your morning gets quieter. Not faster necessarily, just quieter. You stop opening the drawer and immediately feeling behind. You stop doing the thing where you find yesterday’s mascara cap on the counter and wonder how it got there. You stop buying a replacement for something you already have because you couldn’t see it.
The 4-Zone Vanity Drawer Method isn’t a big project. It’s a Sunday afternoon with a trash bag and a $9 bin set. That’s genuinely all it takes to go from the drawer you dread opening to one you don’t think about at all, which is exactly how a good system should feel.
If you’re still building out your bathroom storage beyond the drawer, start with how to organize under the bathroom sink for everything that lives below, then work outward from there. What part of your bathroom drawer is giving you the most trouble right now? Drop it in the comments below.