Walk In Pantry Organization Ideas for Maximum Storage (25 Smart Layouts That Actually Last)
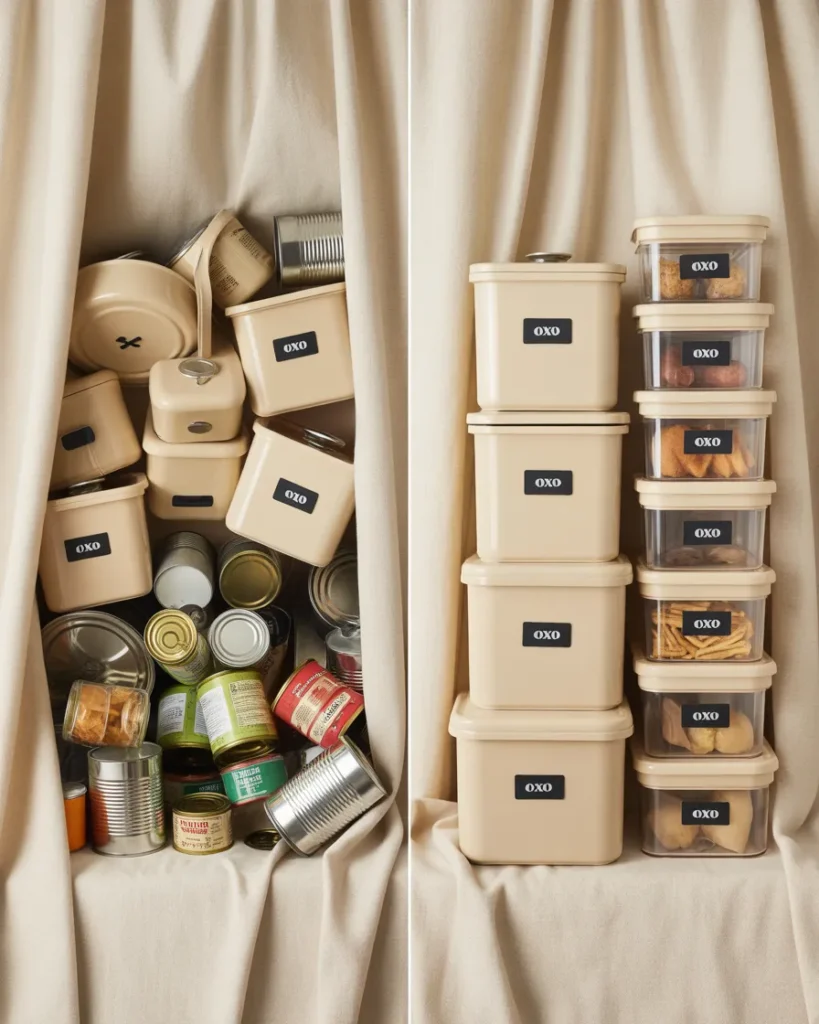
You opened the pantry door, sighed, and closed it again. Three half-open cracker boxes are leaning on a bag of flour, the canned tomatoes are hiding behind a forgotten jar of capers, and there’s a sticky ring on the second shelf you’ve been ignoring since February. We’ve all stood in that doorway holding a coffee, wondering how a room with this much potential can be this much chaos.
Here’s the good news. Walk in pantry organization is not about a $400 Container Store haul or a weekend renovation. It’s about smart zones, the right containers, and a few sneaky tricks for those deep shelves nobody talks about. After testing this exact system in my own pantry last spring (and rebuilding it twice when version one fell apart), I’ve narrowed it down to 25 ideas that actually hold up past week three.
This guide is organized by zone: floor up to ceiling, then door and walls, then styling. That way you can fix the part of your pantry that’s bothering you right now without reading the whole post.
Who This Is For
You’ll get the most out of this post if you fall into one of these camps:
- Homeowners with a builder-grade walk-in pantry and wire shelves that sag in the middle.
- Renters who want a serious refresh without drilling, painting, or losing a deposit.
- Small-space dwellers working with a 3-by-5 foot pantry that has to do everything.
- Budget-conscious shoppers building this in stages from Dollar Tree, Target, and IKEA.
- Aesthetic-driven readers who want a setup that photographs well and survives a real Tuesday.
What You’ll Need Before You Start
Before any walk in pantry organization project, do this fifteen-minute prep so you don’t lose momentum halfway through.
- A trash bag and a “donate” bag.
- A damp microfiber cloth and a small bowl of warm water with a squirt of dish soap.
- A measuring tape (the most skipped tool, the most regretted).
- A piece of paper to sketch your zones.
- One hour, minimum, with no kids and no podcast (you need to think).
Pull every single item out. Wipe the shelves. Toss anything expired. Group what’s left into rough piles: breakfast, baking, snacks, dinner staples, drinks, paper goods. Now you can plan around what you actually own, not what you wish you owned.
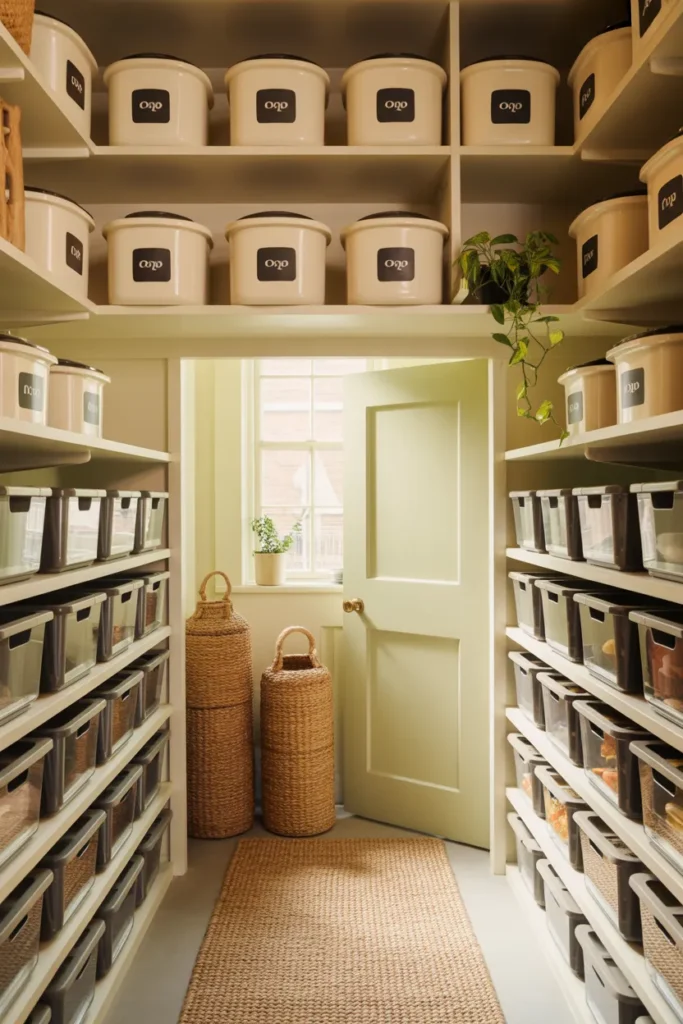
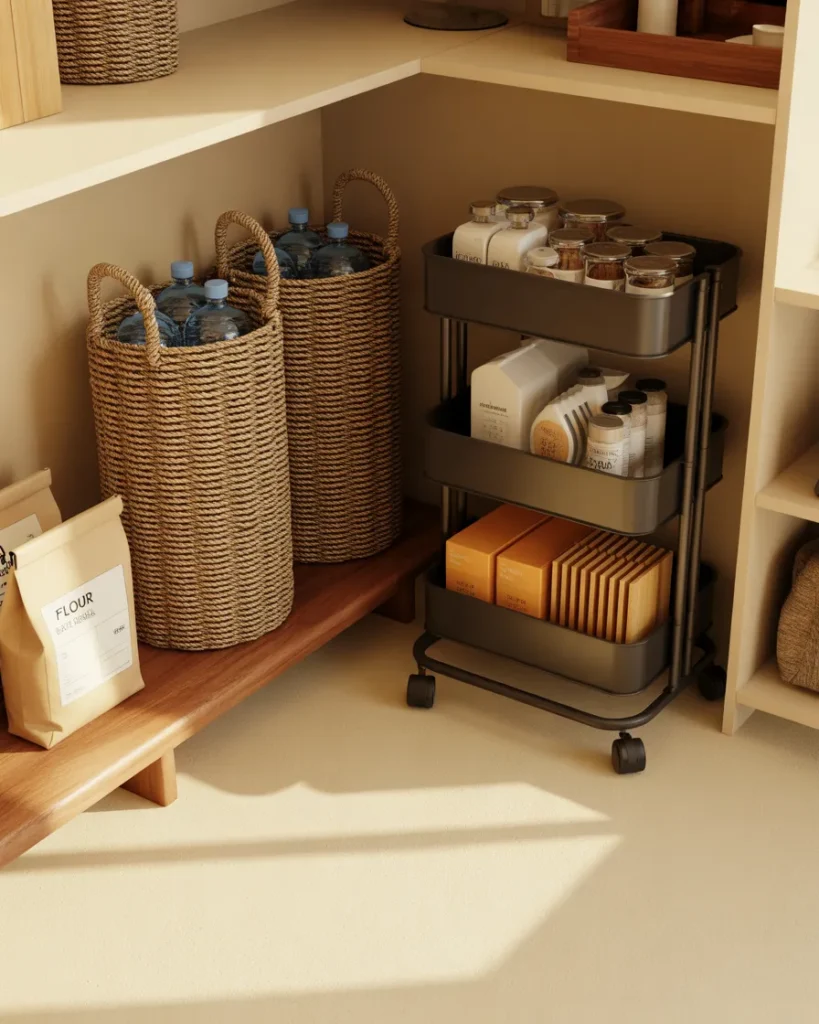
Zone 1: The Floor (Don’t Waste It)
Most pantries treat the floor like a dumping ground for bulk paper towels and that 24-pack of seltzer. Floor zones earn their square footage when you give them a job.
1. Roll In a Three-Tier Cart for Drinks or Baking
A slim rolling cart (the IKEA Råskog runs about $35) tucks into a 12-inch-wide gap and holds an entire baking station: flour bin, sugar bin, mixing bowls, hand mixer. Roll it out to the counter when you bake, roll it back when you’re done. Why it works: it turns dead floor into mobile counter space and keeps small appliances off your kitchen counters.
2. Use Tall Woven Baskets for Bulk and Bottles
Two seagrass or rattan baskets (about $20-$30 each at HomeGoods) corral water bottles, sports drinks, dog food bags, or potato bins. Pick baskets with handles so a 7-year-old can drag one out without scratching the floor. Skip floor stacking — anything not in a basket becomes invisible within a week.
3. Lift Heavy Bulk Onto a Low Platform
A simple two-inch wooden riser keeps a 25-pound bag of dog food off the cold floor and makes sweeping ten times easier. Why it works: moisture and dust collect at floor level, and a riser saves the bag bottom from rotting through.
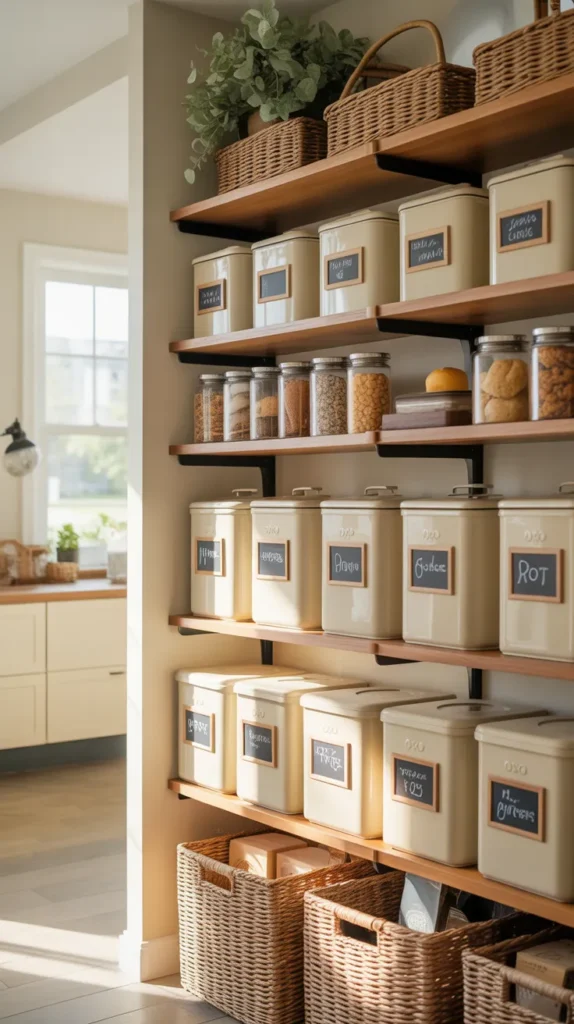
Zone 2: The Eye-Level Sweet Spot (Where the Magic Happens)
The two shelves between waist and shoulder height are the most valuable real estate in the entire pantry. This is where you put the things you grab every single day. Get this zone wrong and the whole system collapses.
4. Decant the Six Daily-Use Staples (and Only Those)
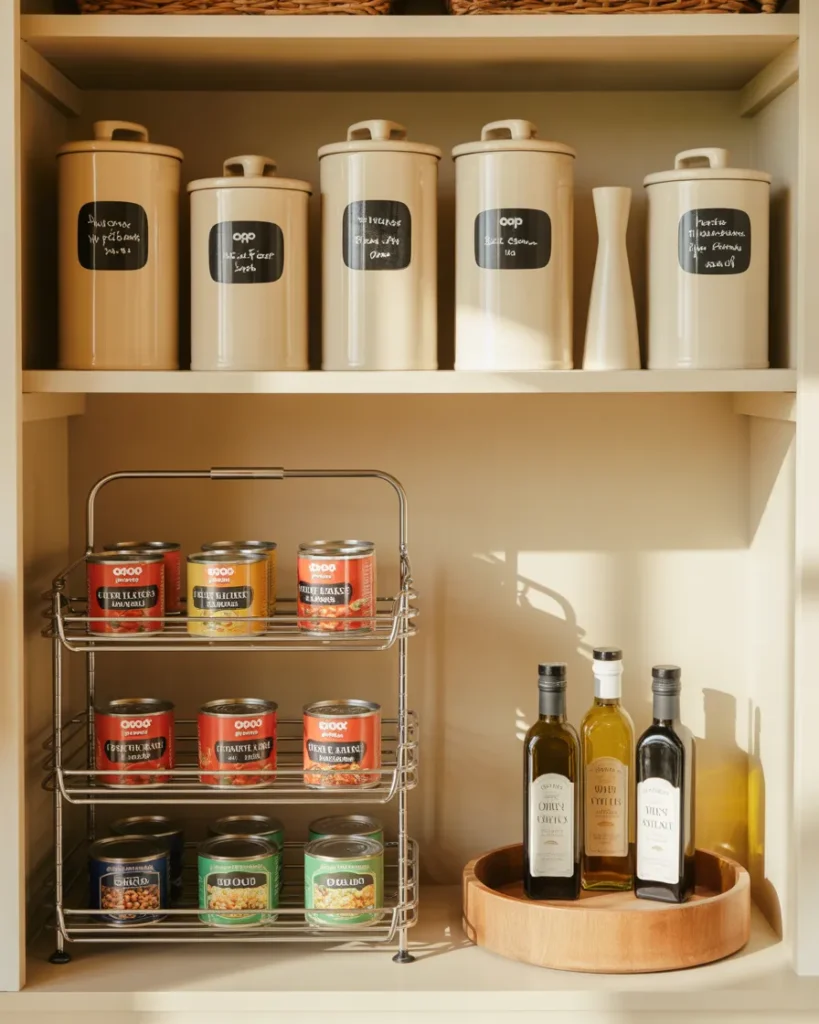
Decanting every single thing into matching jars is a Pinterest fantasy that fails fast. Pick six items you actually reach for daily and decant only those: cereal, oats, pasta, rice, coffee beans, sugar. The OXO POP canisters at Bed Bath & Beyond run about $15-$20 each. The Vtopmart 6-piece set on Amazon is the “OXO alternative that costs half as much” at around $26 for the full set. Why it works: matching jars are easier to stack, easier to see fill levels on, and they buy you an extra two to three weeks of freshness on cereal and chips.
5. Use Tiered Risers for Cans and Spice Jars
Three-tier risers (about $12 at Target, sold as “expandable shelf risers”) triple your visibility on canned goods. You can finally see the back row without doing archaeology. Stack tomatoes on tier one, beans tier two, soups tier three. Or by brand if your brain works that way. Either is fine, both beat a flat shelf.
6. Add a Lazy Susan for Oils, Vinegars, and Hot Sauces
A 12-inch turntable spins the bottle you need to the front. The mDesign two-pack runs around $25. Why it works: vinegars and oils are the items most likely to get knocked over and forgotten in a back corner. A turntable forces them into the rotation.
Zone 3: The Deep-Shelf Rescue System (Nobody Talks About This)
Standard walk-in pantry shelves run 16 to 24 inches deep, and the back six inches turn into a graveyard. This is where most pantries fail. Here’s the fix.
7. Use Bins as Pull-Out Drawers (Bin Method)
Clear stackable bins from The Container Store ($14-$20) act like drawers without the install cost. You pull the whole bin out, grab what you need, slide it back. Why it works: you stop losing items behind other items. Pick bins with a deep front lip so you can grab one-handed.
8. Install Felt Furniture Pads on Bin Bottoms
This one tip changed my whole pantry. Stick four felt pads on the underside of every bin and every basket. They glide instead of scrape, your shelves don’t get scratched, and you’ll actually pull bins out instead of giving up. The 48-pack from Amazon runs about $7.
9. The 3-Section Deep-Shelf Rule
Divide every deep shelf into front-middle-back sections. Front: daily snacks and staples. Middle: weekly items. Back: backup stock and bulk. Label the bins by section if you live with anyone who “puts things back wherever.” This single rule is what separates a pantry that stays organized from one that drifts back to chaos in two weeks.
10. Add Pull-Out Wire Drawers for Permanent Fixes
If you own your home and you’re done fighting deep shelves, pull-out wire drawers from Lynk Professional ($30-$70) or Home Depot’s Closetmaid line ($25-$50) screw onto existing shelves. They turn a 24-inch shelf into something you can actually use the back of.
Quick framework: The Three-Bin Test. If you can’t pull three bins out of a shelf in under ten seconds without bumping anything, your spacing is wrong. Re-bin or re-space.
Zone 4: The Top Shelves (Lighter, Smarter)
Top shelves are for things you use rarely or things that benefit from being out of reach.
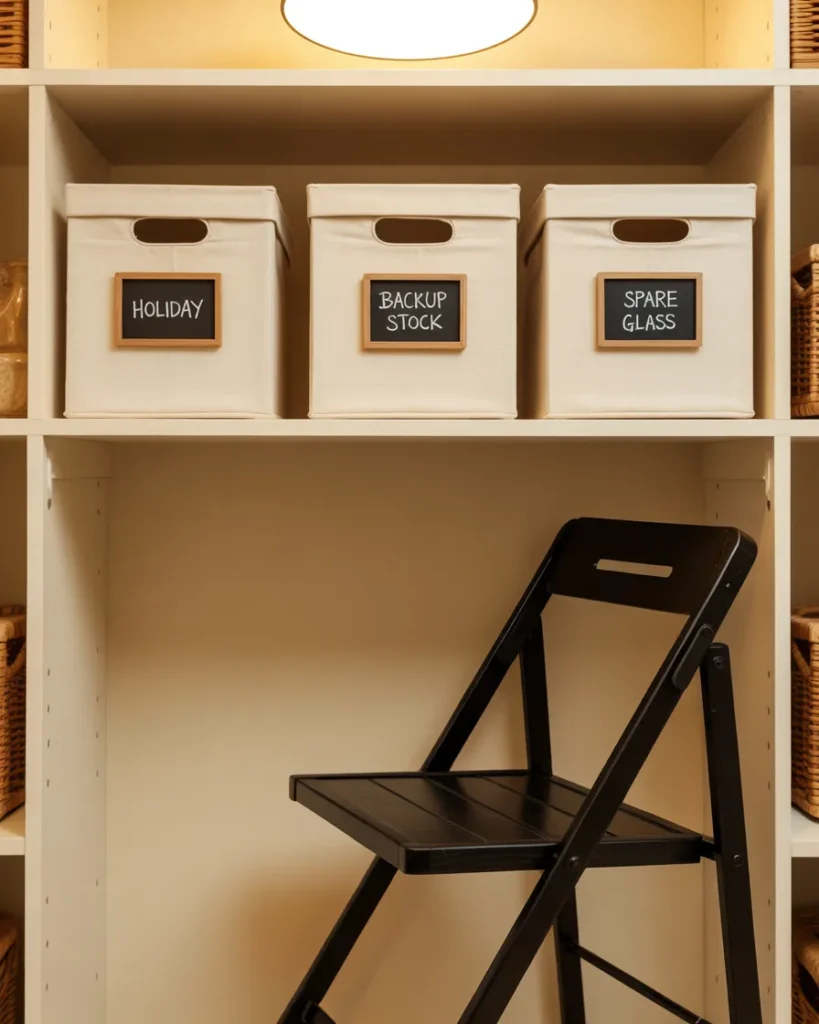
11. Store Backup Stock and Holiday Items Up High
Spare canned goods, the Thanksgiving roasting pan, gift bags, the tall pitcher for Christmas eggnog. If you reach for it less than once a month, it goes up.
12. Use Labeled Lidded Boxes Up Top
Open baskets up high collect dust like a science experiment. Lidded fabric storage boxes (Target’s Brightroom line, $10-$15) keep top-shelf items clean and look intentional from below. Add a label to the front edge so you can read it while standing on the floor.
13. Keep a Step Stool Inside the Pantry
A slim folding step stool (under $20 at Walmart) tucks against the side wall. Without one, the top shelf becomes the place where things go to die. Why it works: access is everything. If you can’t reach it easily, you won’t use it.
Zone 5: The Door (Most Wasted Space in Any Pantry)
The back of your pantry door is roughly 6 square feet of free real estate. Most people use it for nothing.
14. Add an Over-the-Door Rack for Spices and Snacks
The Elfa over-the-door rack from The Container Store ($60-$120) is the splurge. The Lavish Home five-tier rack on Amazon ($24-$40) is the budget pick that does 80% of the same job. Hang spices on the top tier (you’re at eye level when the door’s open), single-serve snacks on the middle, and water bottles on the bottom.
15. Stick Magnetic Strips for Foil and Wrap
A 12-inch self-adhesive magnetic strip (about $8 on Amazon) holds aluminum foil, plastic wrap, and parchment boxes vertically on the door. No drilling, command-strip safe, removable. Rental-friendly flag: this is one of the few door upgrades that leaves zero damage.
16. Add a Small Chalkboard for the Running Grocery List
A 9-by-12 chalkboard stuck to the door (Command strips, $15) holds your running grocery list. Why it works: you write things down the second you run out, not at the store with a confused expression. This single habit saves about $20 a week in forgotten ingredient runs.
Zone 6: The Walls (Your Hidden Bonus Shelf)
The narrow strips of wall between shelves and the side walls of your pantry are pure storage gold.
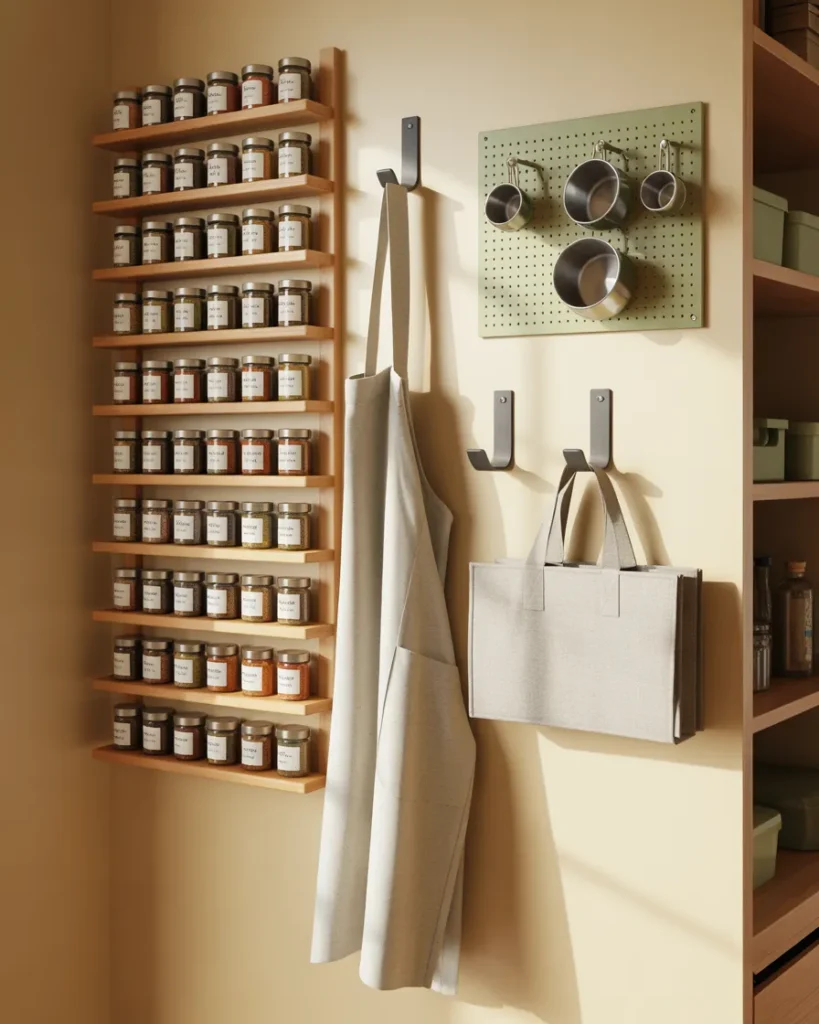
17. Install Slim Spice Racks on the Side Walls
A six-inch-deep slim shelf along a side wall holds 30+ spice jars. The Bamboo Spice Wall Mount on Amazon runs about $25 and screws into drywall (or sticks with heavy-duty Command strips for renters).
18. Add Hooks for Brooms, Aprons, and Reusable Bags
Three Command hooks ($8 for a four-pack) clear the floor of brooms, aprons, and that crumpled wad of reusable grocery bags. Get everything off the floor. Period.
19. Use a Pegboard Wall for the Maximalist Look
A 24-by-24 inch pegboard from Home Depot ($20) painted cream or sage green turns a side wall into a flexible storage grid for measuring cups, oven mitts, and small tools. Mid-Century Modern and Organic Modern pantries love this look.
If walls are your weak spot in general, our vertical storage ideas guide walks through the same principles for closets, garages, and small bedrooms.
Zone 7: Labels, Containers, and the Stuff That Makes It Stick
Every walk in pantry organization system lives or dies on labels. Here’s how to do them once and not redo them every time you swap a brand.
20. Use a Label Maker, Not Hand-Written Tape
The Phomemo D30 label maker ($25 on Amazon) prints in seconds, sticks to anything, and looks intentional. The Brother P-Touch Cube ($60) is the splurge with better fonts. Either way, type and print 30 labels in one sitting and you’re done.
21. Pick One Label Style and Stick With It
Black text on a clear background reads as Modern Farmhouse and Organic Modern. White chalk on a black chalkboard label reads more Cottagecore. Wood-burned wood tags read Japandi. Pick one. Mixing styles makes a pantry look chaotic even when it’s not.
22. Choose Containers in Three Sizes Max
A Container Store-style perfect pantry uses canisters in three heights: small (cereal, beans), medium (flour, sugar), tall (pasta, spaghetti). Three sizes look styled. Six sizes look like a yard sale.
Zone 8: Aesthetic Touches (The Pinterest-Worthy Layer)
This is the layer that takes a pantry from “organized” to “I want to take a picture of this.”
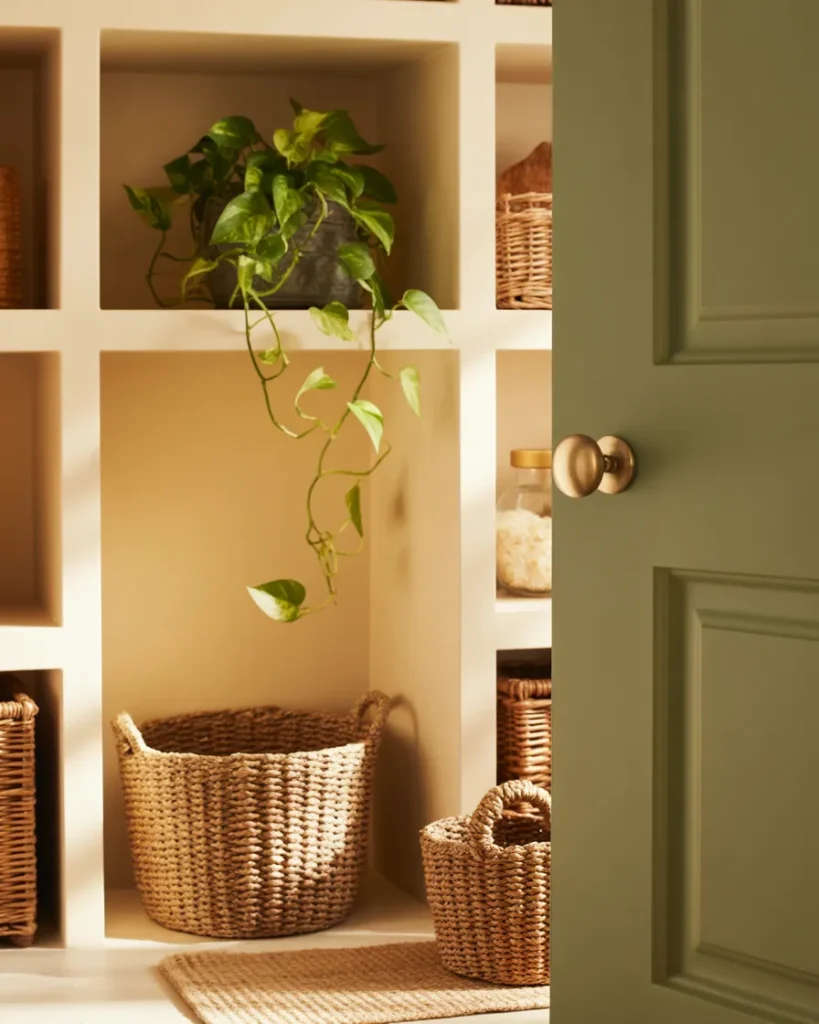
23. Add One Living Plant on a High Shelf
A small pothos or snake plant (under $15 at Home Depot) on the top shelf adds the green that every Pinterest pin in this niche is wearing. Pothos thrives in low light, which most pantries are. Why it works: it softens the grid of jars and bins and adds the natural element that defines Organic Modern style.
24. Swap Hardware to Black or Brushed Brass
If your pantry door has a builder-grade silver knob, swap it for a matte black or brushed brass one ($8-$15 at Home Depot). The “walk in pantry organization black” Pinterest search is huge for a reason. One small swap changes the whole feel of the room. Rental note: keep the original knob in a Ziploc and reinstall it on move-out.
25. Add a Small Woven Runner on the Floor
A 2-by-3 jute or seagrass runner ($25 at HomeGoods) inside the pantry adds warmth and protects the floor under that 25-pound dog food bag. Seasonal callout: swap to a deeper rust or sage runner for fall, back to natural jute for spring.
Budget vs Splurge: A Real Comparison
| Category | Budget (Under $25) | Mid-Range ($25-$100) | Splurge ($100+) |
|---|---|---|---|
| Canisters | Vtopmart 6-pack ($26) | OXO POP 5-pack ($75) | The Container Store OXO Steel 10-piece ($170) |
| Bins | Dollar Tree clear bins ($1.25 each) | mDesign 4-pack ($35) | iDesign Linus deep ($120 set) |
| Labels | Hand-cut + Sharpie ($3) | Phomemo D30 ($25) | Brother P-Touch Cube ($60) |
| Lazy Susan | Dollar Tree turntable ($1.25) | mDesign 12-inch ($25) | Crate & Barrel marble ($60) |
| Over-Door Rack | Lavish Home ($24) | Salt 5-tier ($40) | Elfa Over-the-Door ($120+) |
| Step Stool | Walmart folding ($18) | Rubbermaid 2-step ($45) | Polder Slim ($90) |
If you’re building this in stages, start with the Phomemo label maker and one set of canisters for your six daily staples. Add bins next month. Build the door zone after that. Trying to do it all in one weekend is how pantries end up half-organized for six months.
For more dollar store ideas that actually look expensive, our Dollar Tree organization hacks post breaks down the $1.25 finds we use the most.
What NOT to Decant (The Food-Safety Truth Nobody Mentions)
Here’s the angle most pantry posts skip and it costs readers real money in spoiled food.
According to USDA food storage guidelines, some pantry staples actually go bad faster outside their original packaging. Don’t decant these:
- Brown sugar. Hardens within days in a non-airtight jar. If you decant, use a true airtight canister with a brown sugar saver disc.
- Whole-grain flours and nuts. The oils go rancid fast. Per Penn State Extension, keep these in the fridge or freezer, not on a warm pantry shelf.
- Coffee beans. Decant only into an opaque, vacuum-sealed canister. Clear glass on a sunny shelf strips flavor in days.
- Spices. Original jars are fine for 1-3 years. Decanting into pretty clear jars exposes them to light and ages them faster.
- Olive oil. Always store in dark glass or a tin, never clear glass on a shelf with any natural light.
This is the “realistic walk in pantry” angle that the Pinterest-perfect crowd skips, and it’s exactly why their pantries fall apart in three months.
Common Mistakes to Avoid
After helping three friends redo their pantries last year, here are the patterns I see over and over.
- Buying containers before measuring shelves. Always measure shelf depth, height, and width first. Then buy.
- Decanting everything. See the food safety section above. Six staples max for 90% of homes.
- Skipping the floor zone. A bare floor is wasted square footage.
- Using only fabric or only clear bins. Clear is for snacks and small items you want to see. Fabric is for top shelves and bulk you want hidden. Mix both.
- Forgetting to leave 20% empty space. A pantry stuffed to the gills can’t absorb a Costco run. Leave room.
- Not labeling the shelf, just the bin. Labels go on both. The shelf label tells you where the bin lives when it gets pulled.
- Doing it all in one day. Burnout is real. Three weekends beats one disastrous Saturday.
If you’re working with a smaller setup or just want a starter project, our small pantry makeover for $50 is the entry-level version of this exact system.
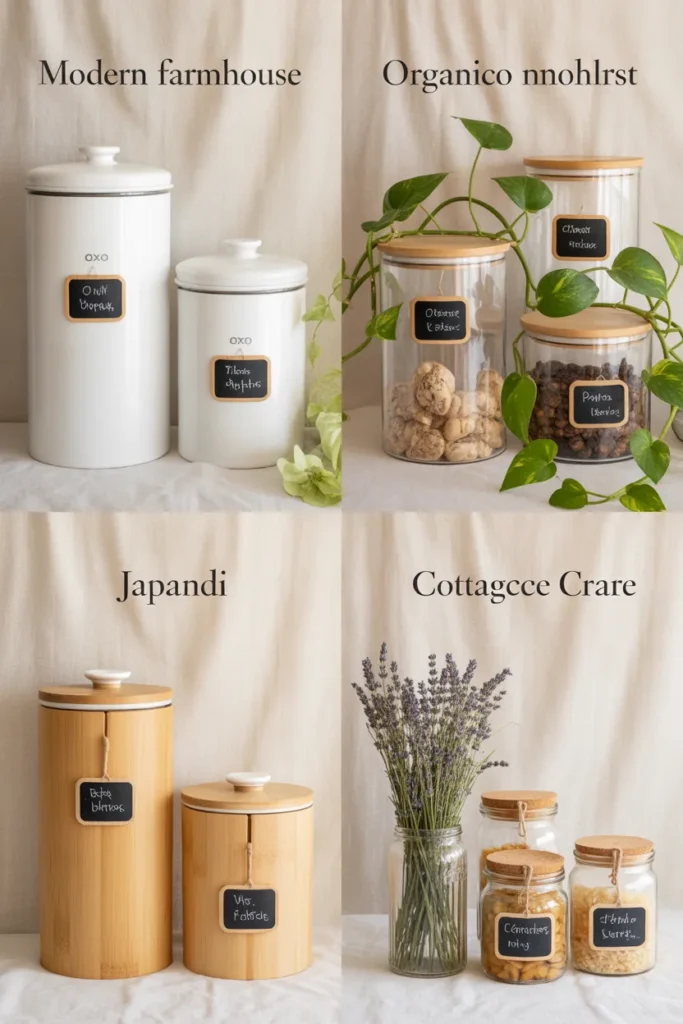
Style It to Match Your Home
A walk in pantry organization setup looks ten times better when it matches the rest of your kitchen. Pick the lane that matches your house and stick with it.
- Modern Farmhouse: cream OXO POP canisters, black chalkboard labels, woven seagrass baskets, chunky wood riser, sage or mustard accent.
- Organic Modern: glass jars with raw oak lids, woven jute baskets, brushed brass hardware, pothos plant, neutral linen runner.
- Japandi: light bamboo canisters, wood-burned tags, simple white linen baskets, no excess decor, single ceramic vessel.
- Cottagecore: vintage glass jars with cork lids, gingham liner inside baskets, dried lavender bunch, antique step stool.
- Minimalist: all matte white containers, unlabeled or single-letter labels, monochrome bins, zero plant.
Frequently Asked Questions
How do you organize a small walk-in pantry?
Start with the floor zone (rolling cart and two tall baskets), claim eye-level for daily staples, push backup stock to top shelves, and turn the door into bonus storage with an over-the-door rack. In a pantry under 25 square feet, every wall earns a job. Skip freestanding furniture and lean on door-mounted and wall-mounted solutions.
How do you organize deep pantry shelves?
Treat them like pull-out drawers using clear stackable bins, divide each shelf into front-middle-back sections (daily, weekly, backup), and add felt furniture pads to bin bottoms so they glide instead of scrape. If you own the home, install pull-out wire drawers on the worst offending shelves. The bin method works in rentals.
What is the budget version of a walk in pantry makeover?
Under $50: Dollar Tree clear bins ($1.25 each, get six), one set of Vtopmart canisters ($26), a cheap label maker or hand-cut Sharpie tags ($5), three Command hooks ($8). Skip the rolling cart for now and add it next month. The small pantry makeover for $50 walks through the full breakdown.
What if I do not have over-the-door space?
Use the side walls. A bamboo wall-mounted spice rack ($25) plus three Command hooks ($8) creates the same vertical zone without touching the door. Pegboards work too if you want a flexible grid. Side walls are the most underused vertical surface in any pantry.
How long does a walk-in pantry organization project take?
Plan three sessions: 1 hour to empty, sort, and wipe down. 2-3 hours to install bins, racks, and labels. 30 minutes a week after that to maintain. Doing it all in one Saturday is how pantries end up half-finished for months. Spread it across two or three weekends and the system actually sticks.
What goes on the top shelf of a walk-in pantry?
Backup stock, holiday items, paper goods, and anything you reach for less than once a month. Use labeled lidded fabric boxes so dust doesn’t collect, and keep a slim folding step stool inside the pantry so the top shelf doesn’t become a graveyard.
How do you make a pantry look aesthetic without spending a fortune?
Pick one container style, one label style, and one accent color. Add a single living plant. Swap the door knob to matte black or brushed brass for under $15. That’s it. Aesthetic comes from consistency, not cost.
A Realistic Final Word
The best walk in pantry organization is the one you’ll actually maintain on a Tuesday in November when you’re tired and you have leftovers in one hand and a bag of groceries in the other. Don’t aim for the magazine cover. Aim for “I can find the peanut butter in three seconds and nothing falls on my head.”
Pin this post so you can come back to it next weekend, then start with one zone (I’d pick eye-level), and let the rest build over the next month. Save the Pinterest pin below to your “Kitchen Inspiration” board so you have it when you need it.
Which zone are you tackling first? The floor, the deep shelves, or the door? That answer tells me everything about what’s been bugging you.